Getting started
The LfPHP Cloud offers a simple way to get you online, as quickly and as easily as possible, with one-click application publishing.
Dashboard
The LfPHP Cloud Services’ Dashboard offers convenient one-click options to set up many kinds of websites, to spin up many types of service and secure them using SSL, to add domains, email accounts, and much more!
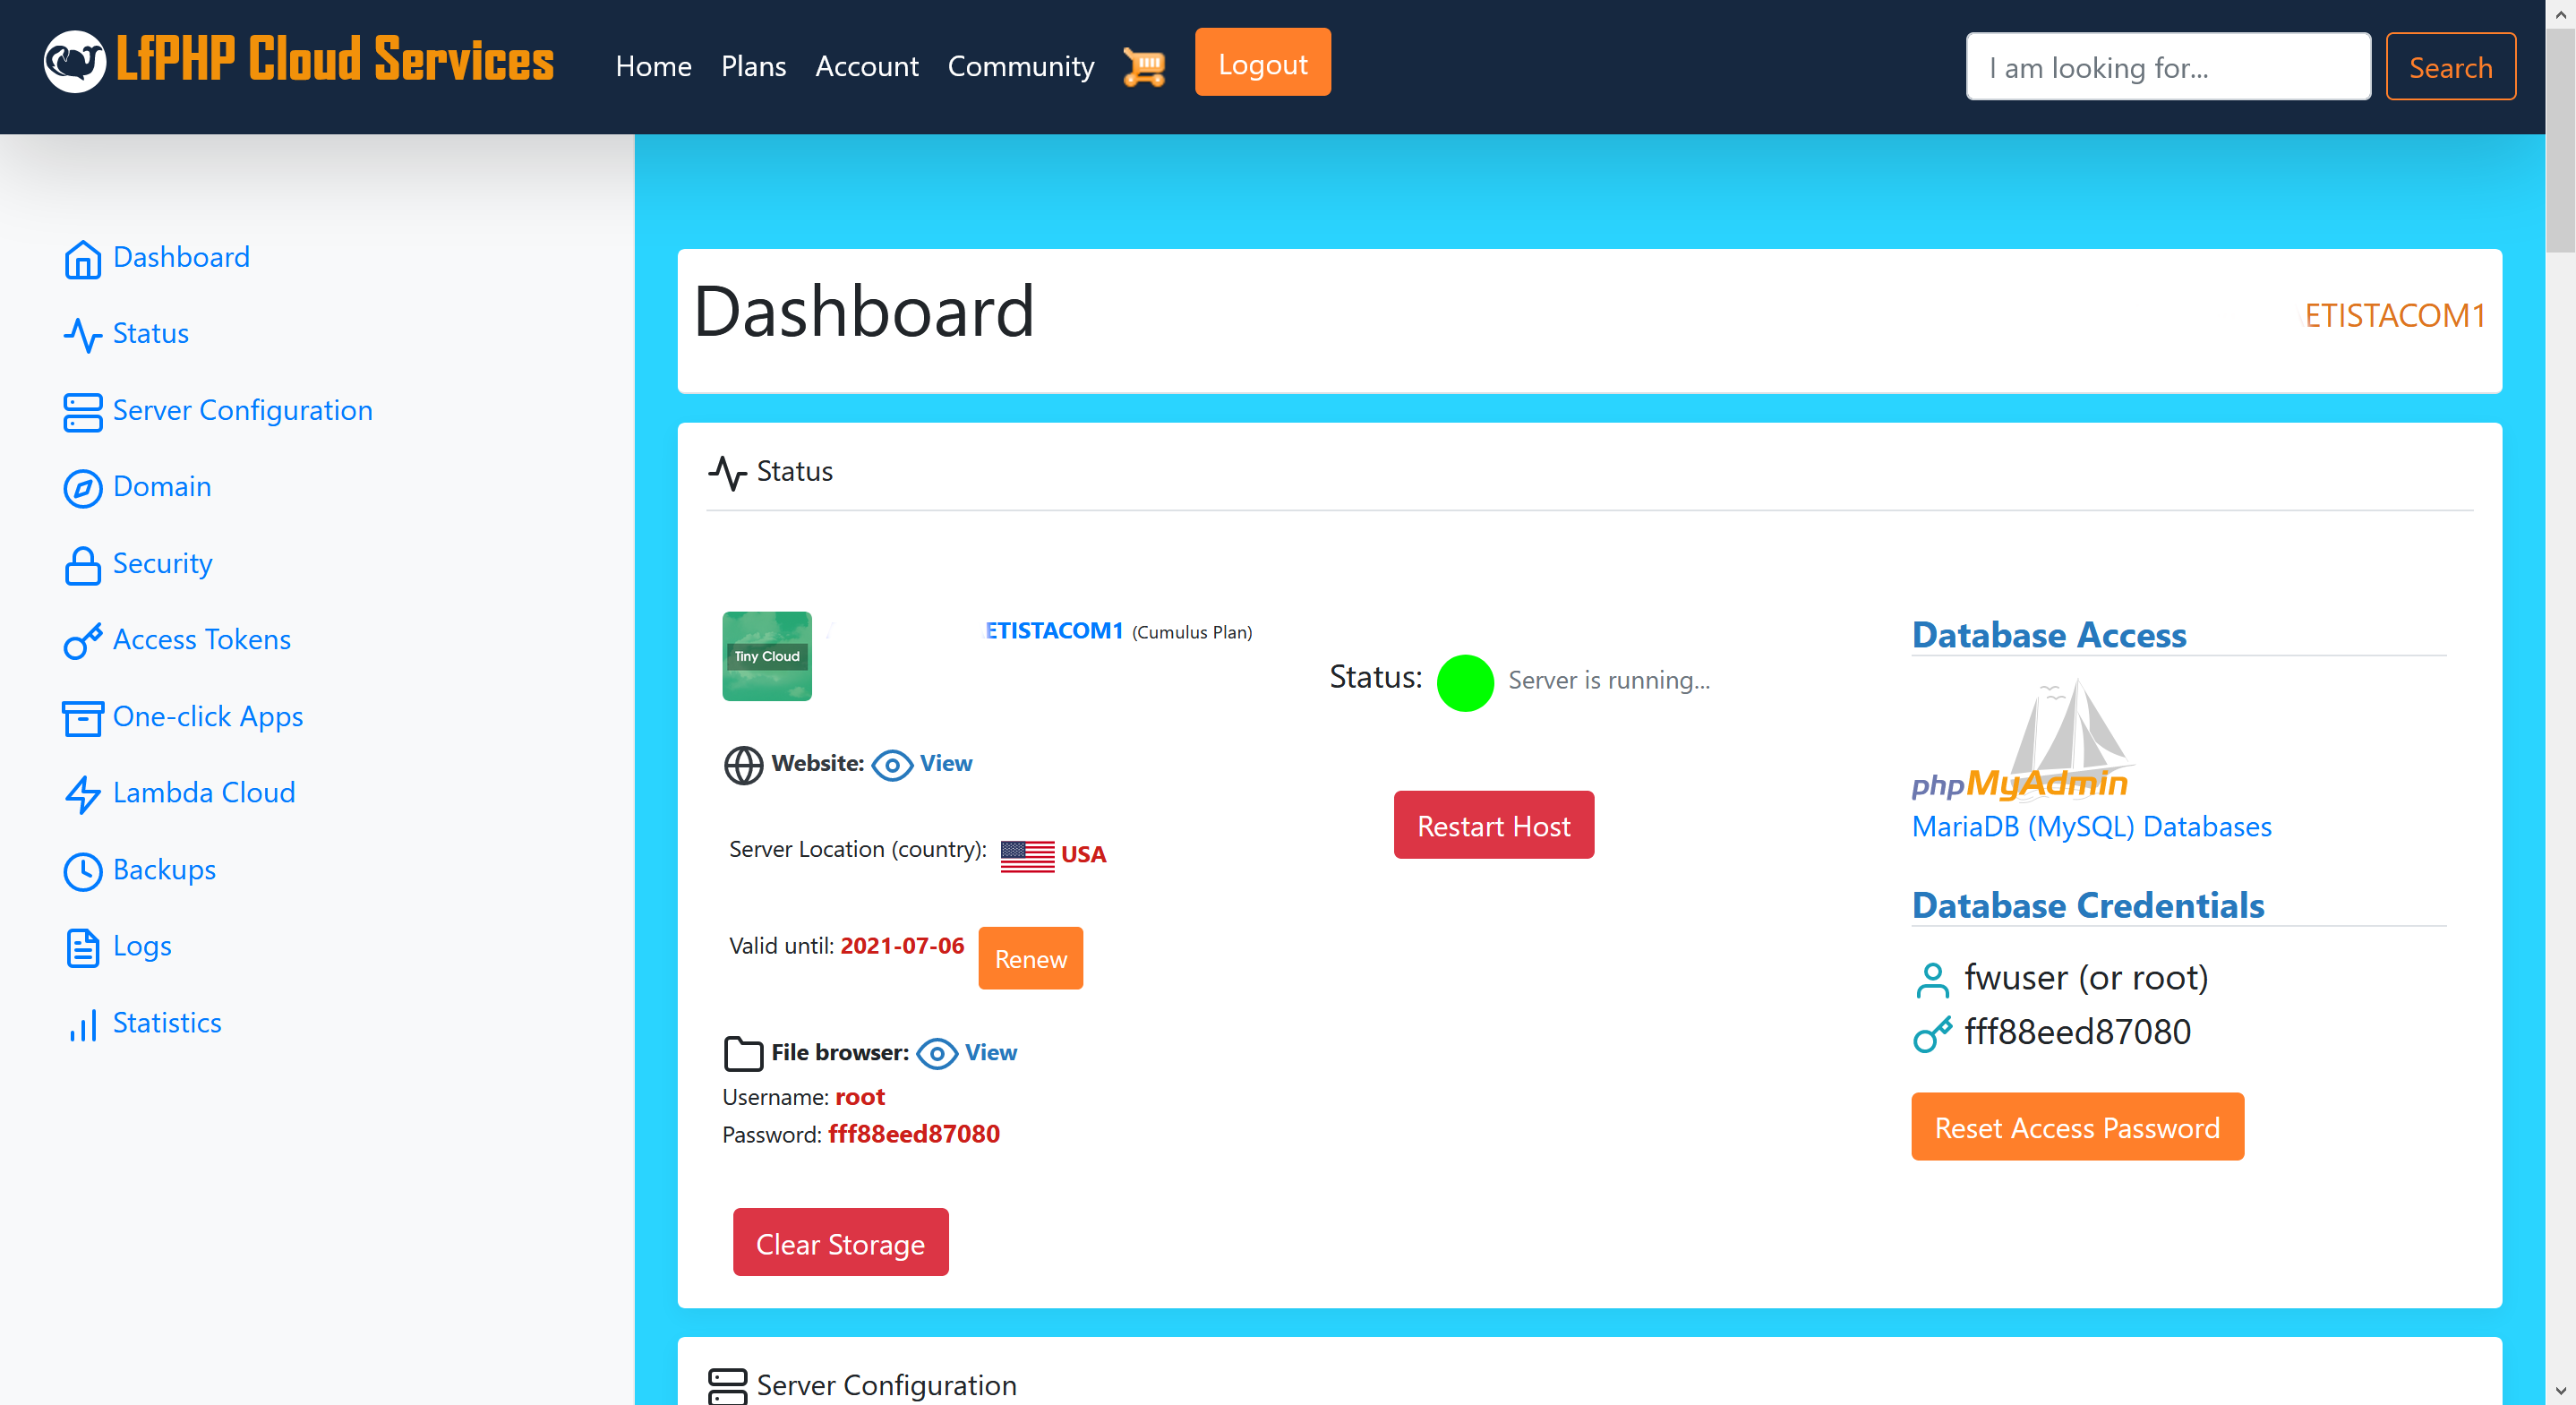
The Dashboard
The main options offered on the Dashboard are:
Status
The Status section allows you to see the current status of your hosting server. It also makes it possible to view your website, get information on the physical location of the hosting server, renew your account for an additional year, clear the storage area of your hosting account, and restart the server if need be.
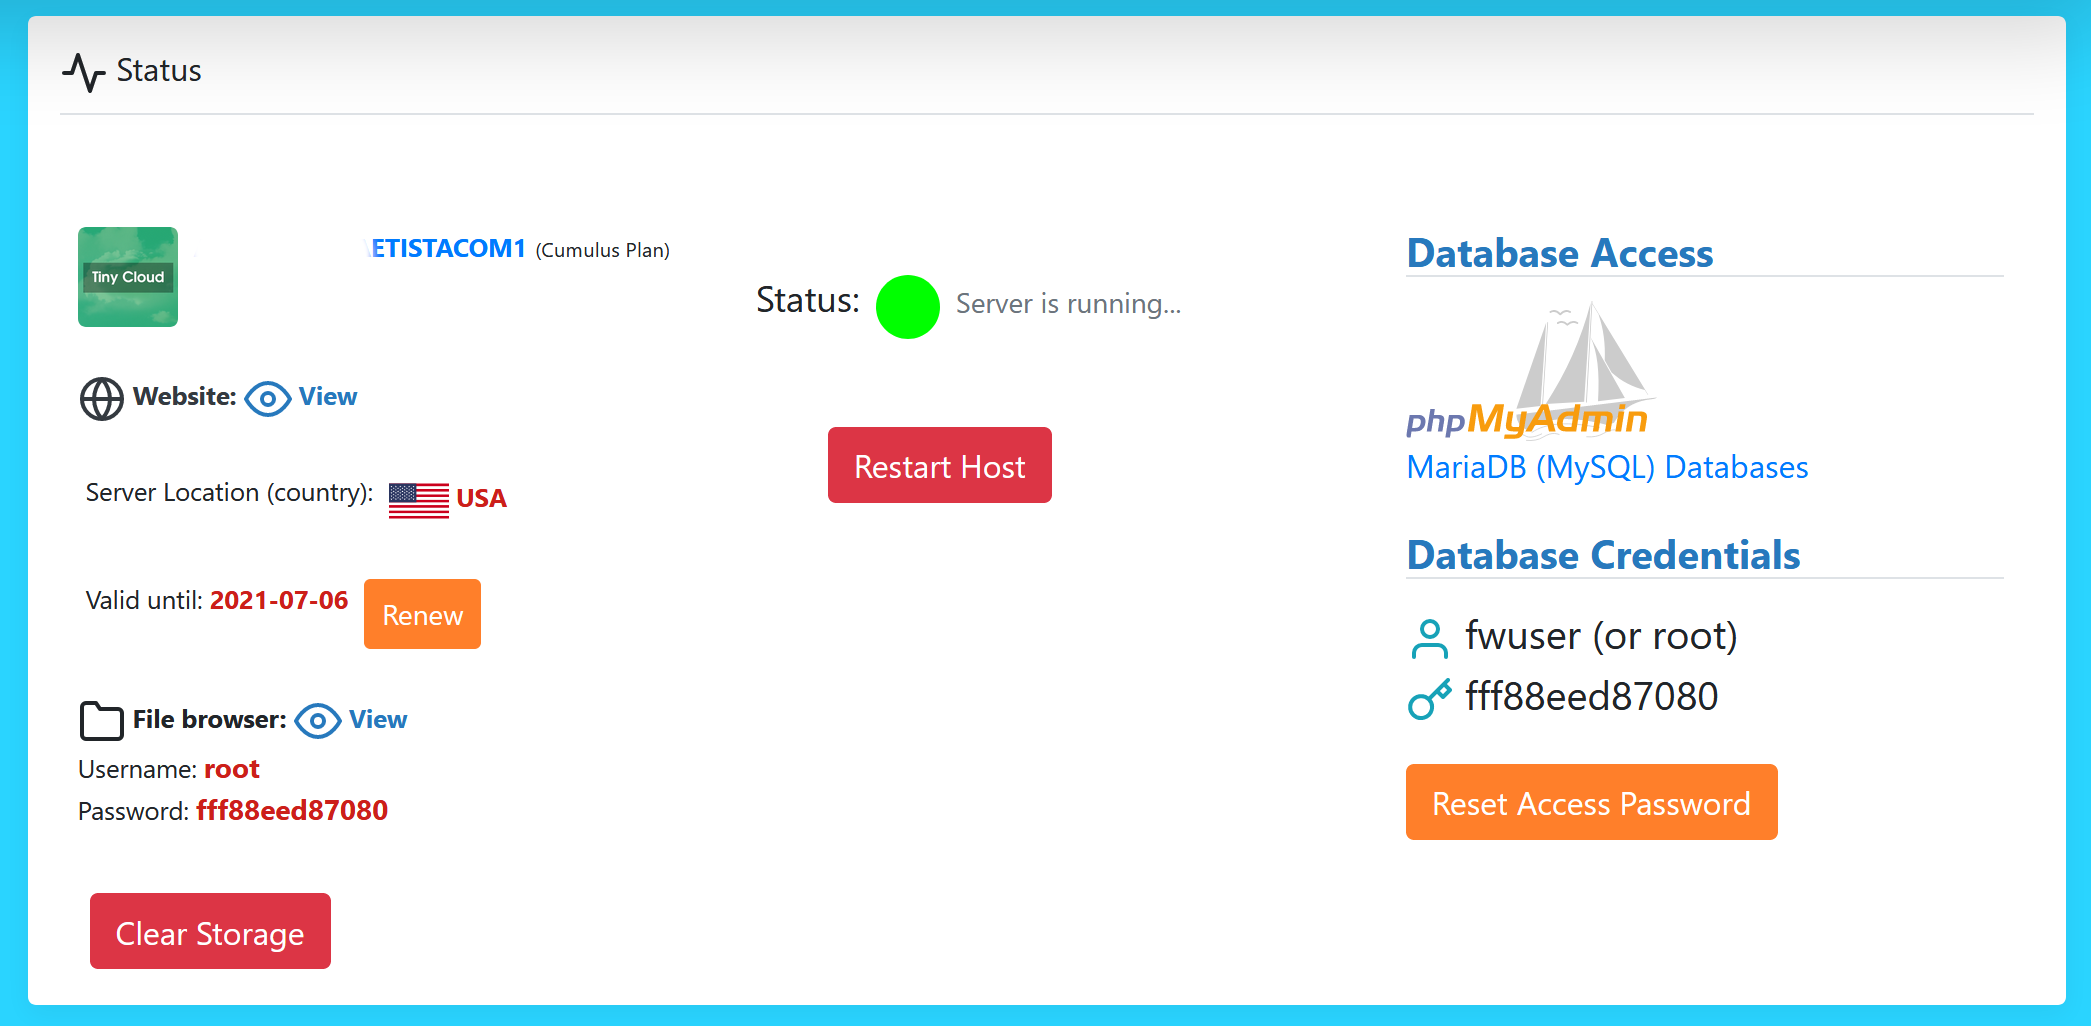
Status of the hosting server
If you’ve deployed your website using one of our one-click apps, you will also be able to access the
FileBrowser of your hosting server and your MariaDB (MySQL) databases through the
phpMyAdmin Web interface. Moreover, you’ll have the ability to reset
the hosting access password (not your main account password) by clicking on the
Reset Access Password button.
FileBrowser
If you have installed one of the One-Click Apps, or you are using a Linux for PHP Docker image with
the lfphp startup command, you will be able to access the file system of your hosting account in the FileBrowser
that can be found in the Status section. Using this utility, you will be able to move, copy, edit, delete, upload,
zip, or unzip specific files or folders. The LfPHP FileBrowser also makes it very easy for you to restore archived backups.
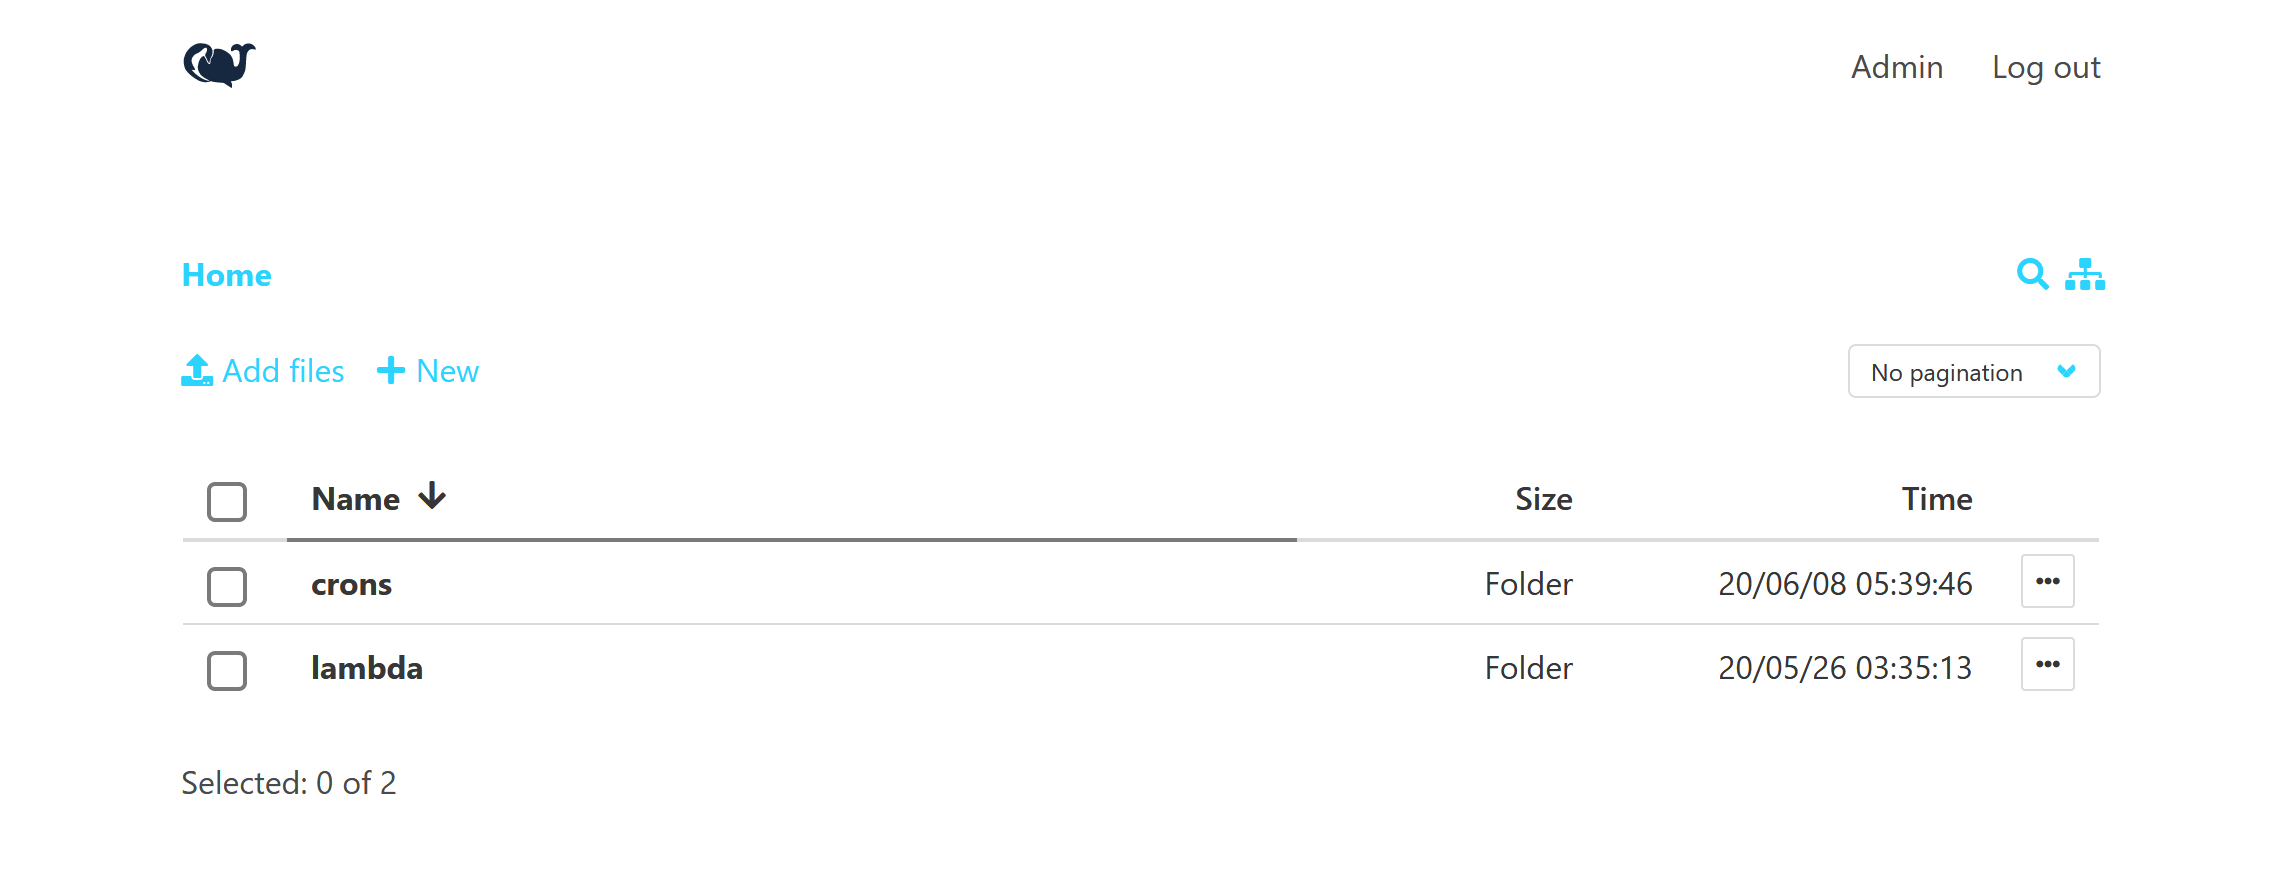
The FileBrowser Application
If you access the FileBrowser, you will notice that you can access the crons folder from the root folder. You can therefore edit the cron files if you need to run certain tasks at certain intervals of time on your hosting account.
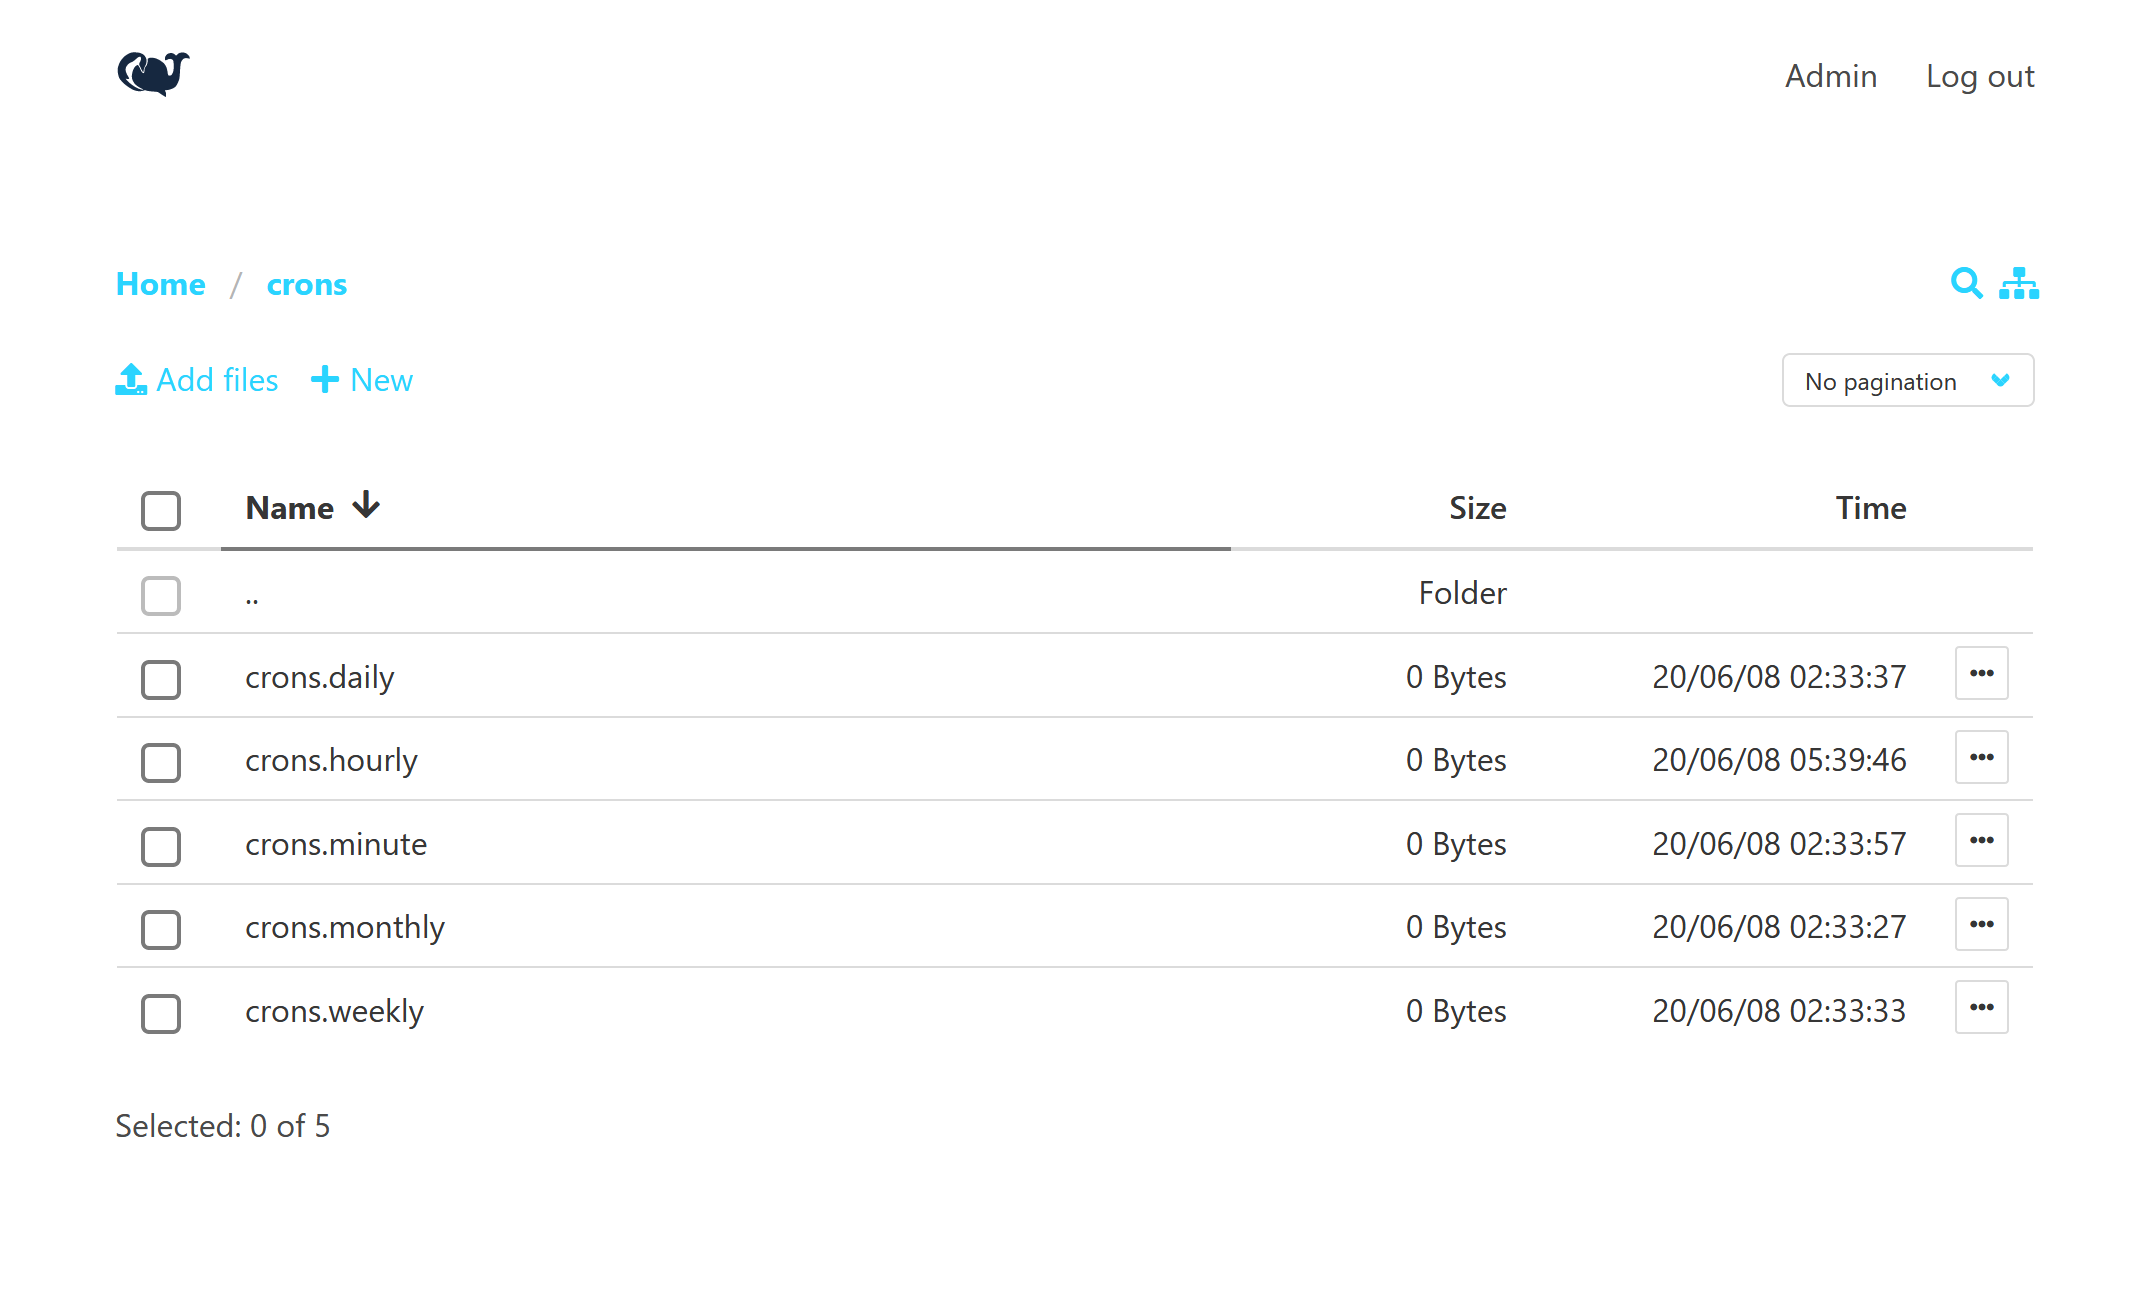
The Cron files
Here is an example on how to execute a cURL request to run the cron job of a Drupal installation:
curl http://myaccount.linuxforphp.com/cron/qH9iYDiCQPcouUbws1iasCMVhOERUq99bIFOLlUe4KAMfs9eSH1yvmSgCvLA9g
Note
All cron jobs are run as the user ‘root’ on the hosting server.
Server Configuration
The Server Configuration section makes it possible to decide which version of PHP you want to use on your hosting server, and which services, like PostgreSQL, Redis, or MongoDB, you want to make available on your server.

Server configuration options
Note
The ‘Default’ PHP version will always correspond to the optimal version of the one-click app that you’re deploying to your hosting server.
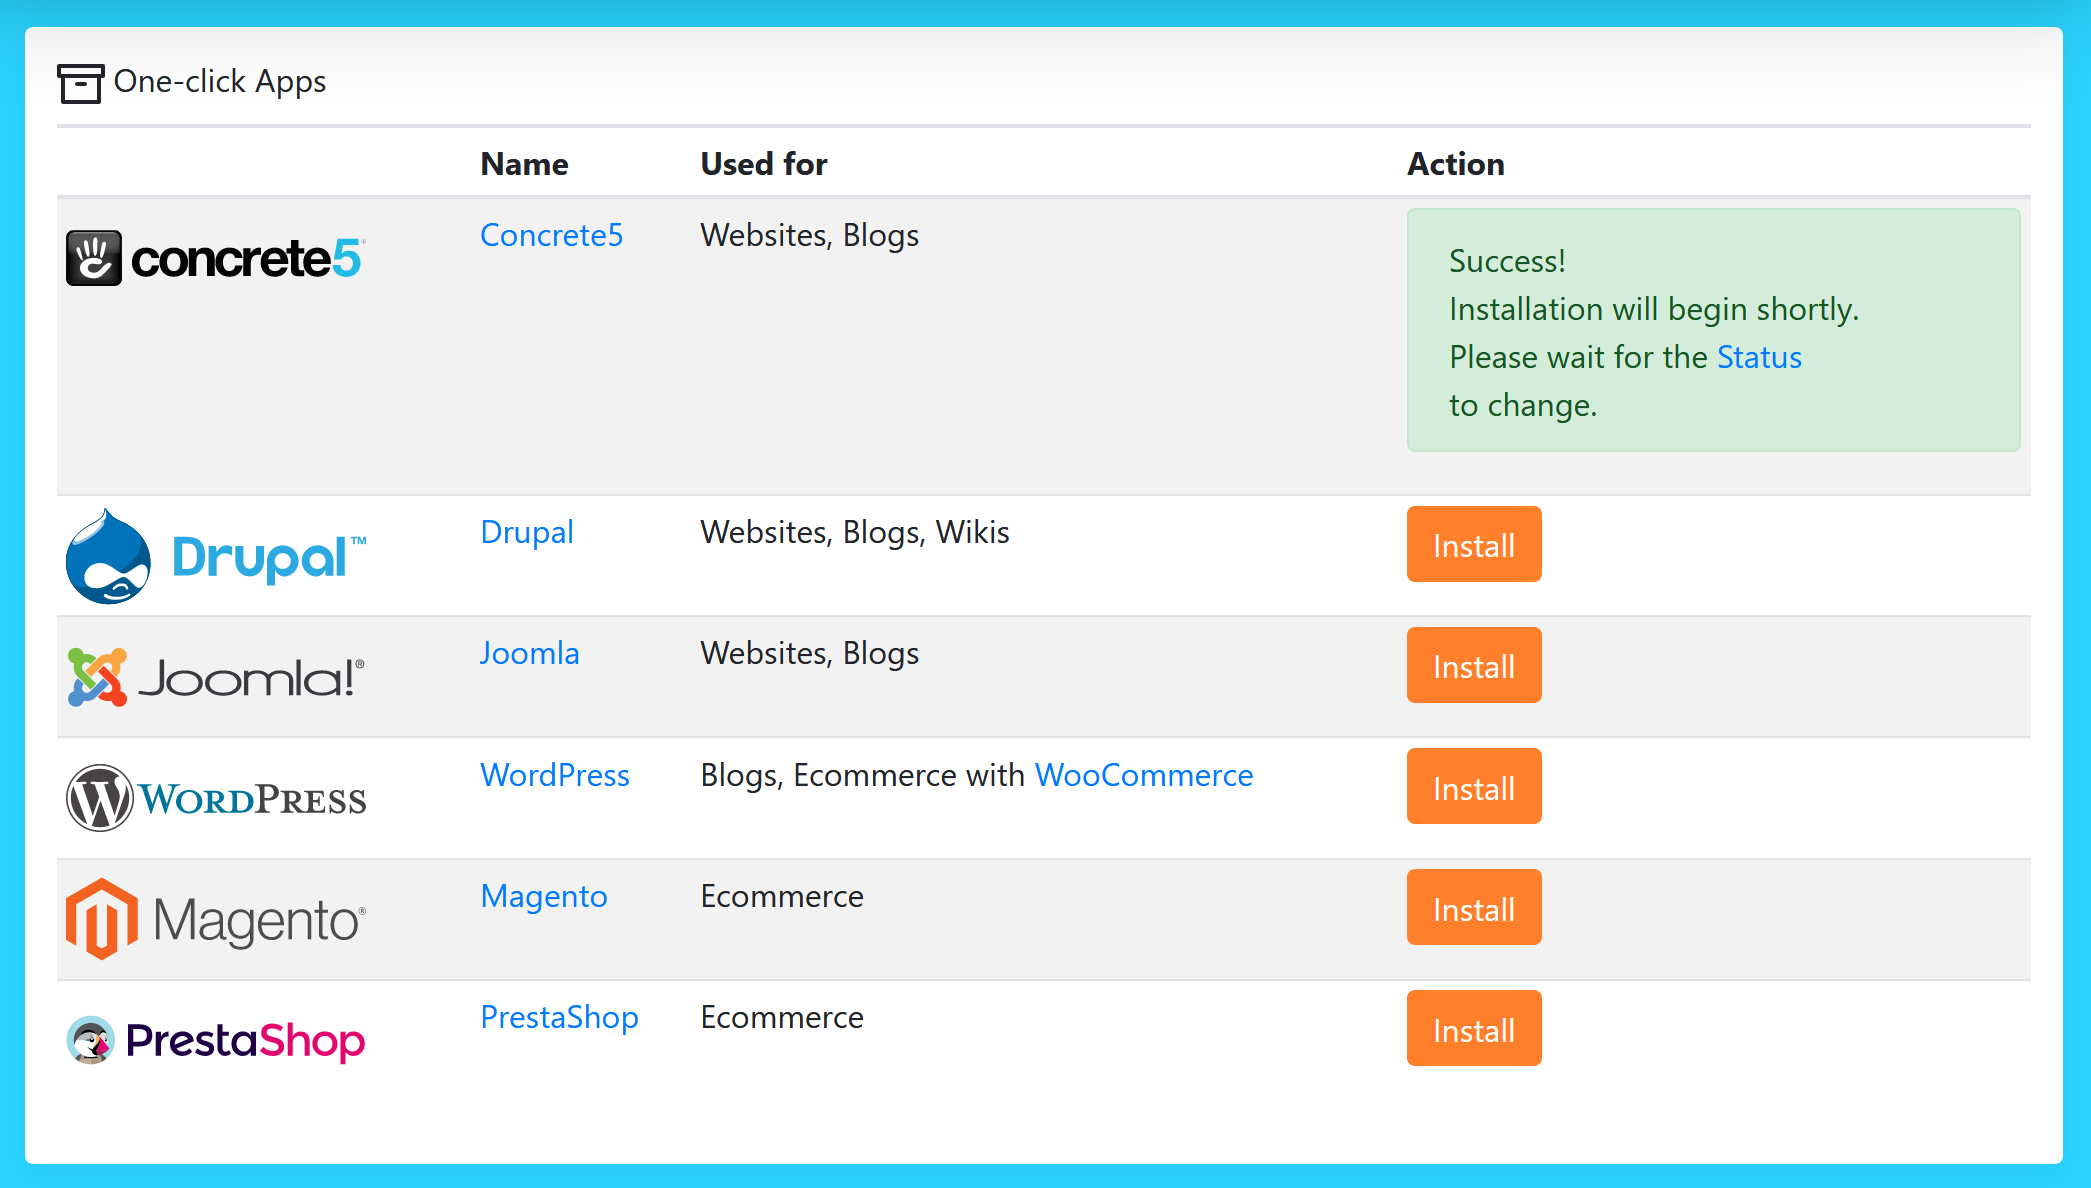
One-Click Apps
The One-Click Apps section allows you to publish your website by choosing from many kinds of websites, depending on your set publication goal. From ecommerce websites to blogs, from wikis to traditional websites, the LfPHP Cloud offers it all from the tip of a single mouse click!

List of one-click apps
Once you click on one of the Install buttons, the system will warn you that it is about to delete any
data in your hosting account before installing your new one-click app. If you need to save any data before
you continue, please Cancel the operation and save your data (see Backups).

Installation confirmation
Once you confirm that you want to publish your new app, the system will start installing your application on your hosting account.
Deployment success message
Note
If you get an error message, please refresh the page and try again. If it still fails, please contact our customer support.
If you now go to the Status section, you should see that the system is now waiting for the installation process to finish.
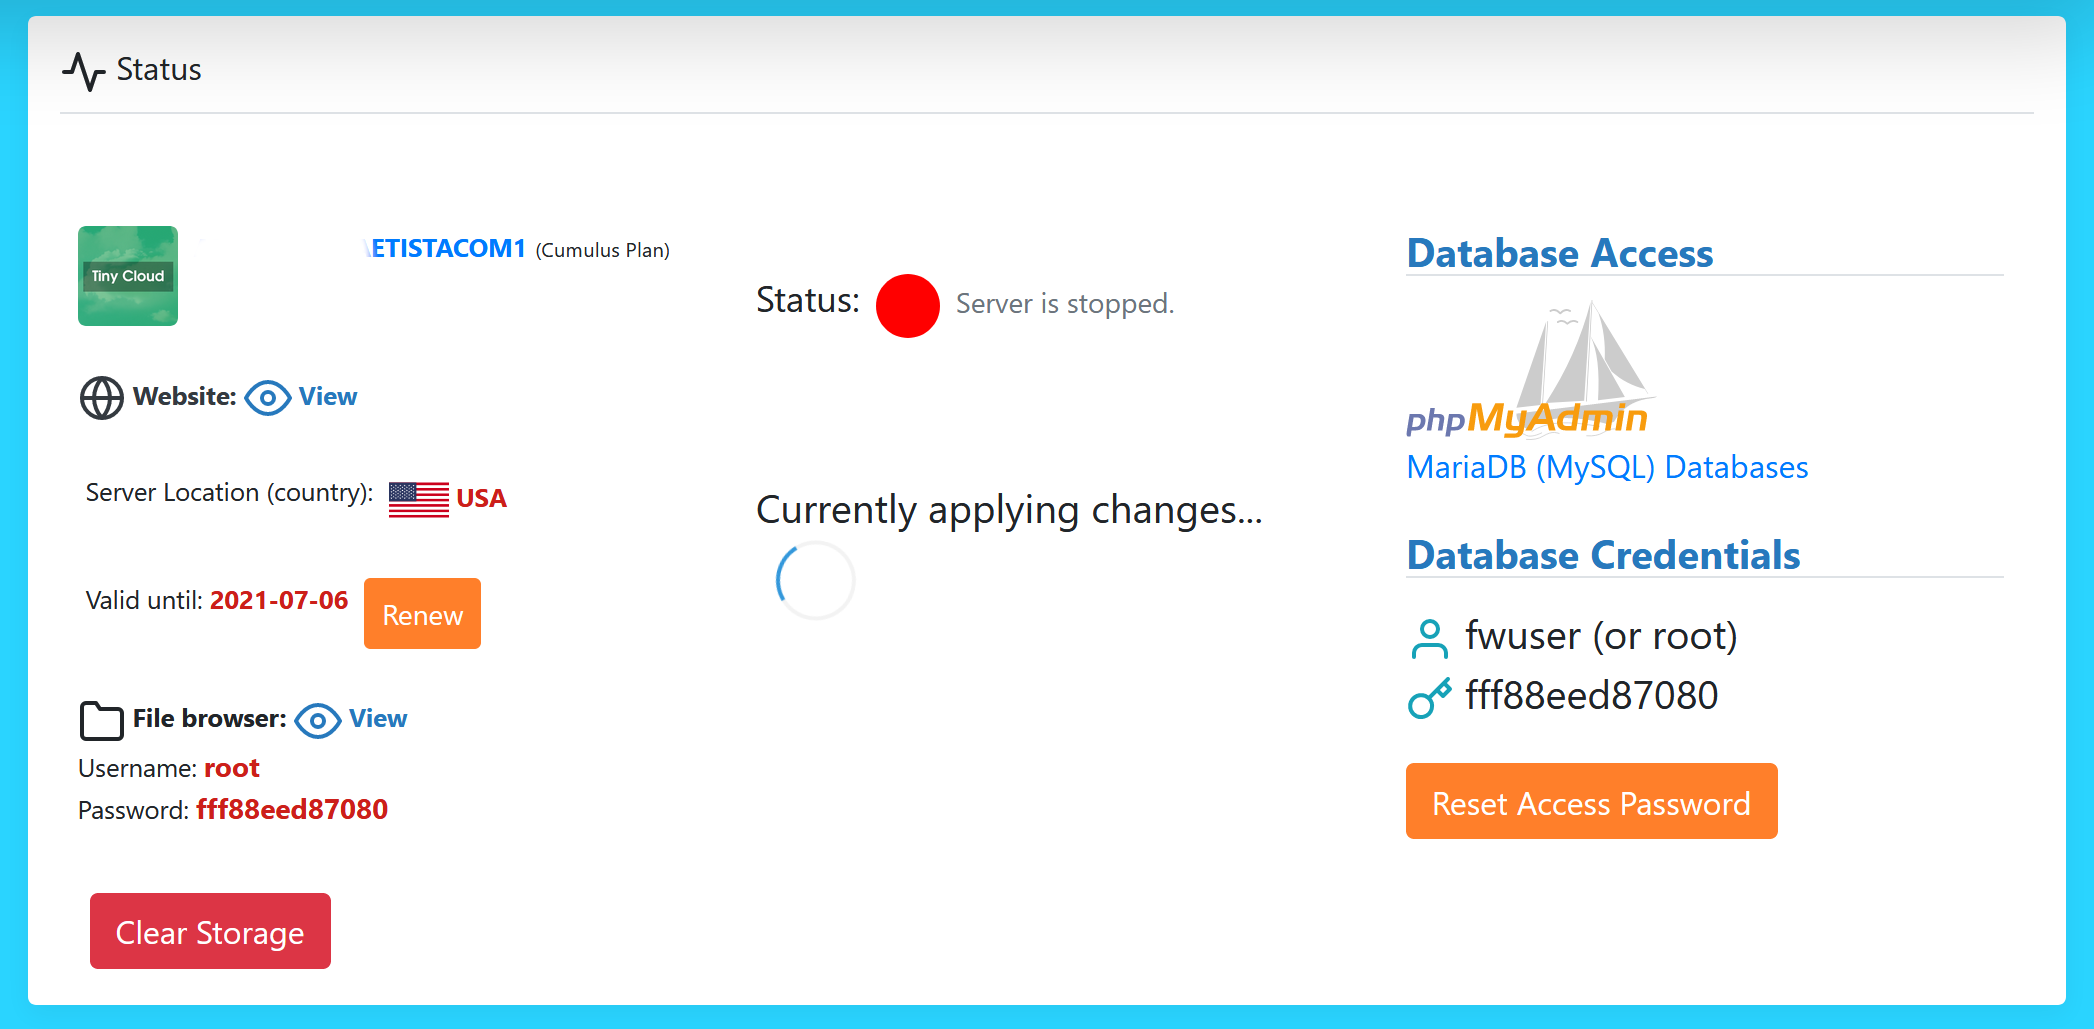
Applying changes to the hosting account
Once your website is ready, the status will change, and you will be able to access your new website in order to complete the final details of the installation.
New app is available
For more information, please read our guide on how to create an instant ecommerce website using the LfPHP Cloud (https://linuxforphp.com/doc/guides/how-to-create-an-instant-ecommerce-website-using-lfphp-cloud-services.pdf).
PHP Lambda Cloud
The PHP Lambda Cloud section allows you to create Function-as-a-Service (FaaS) Web pages.
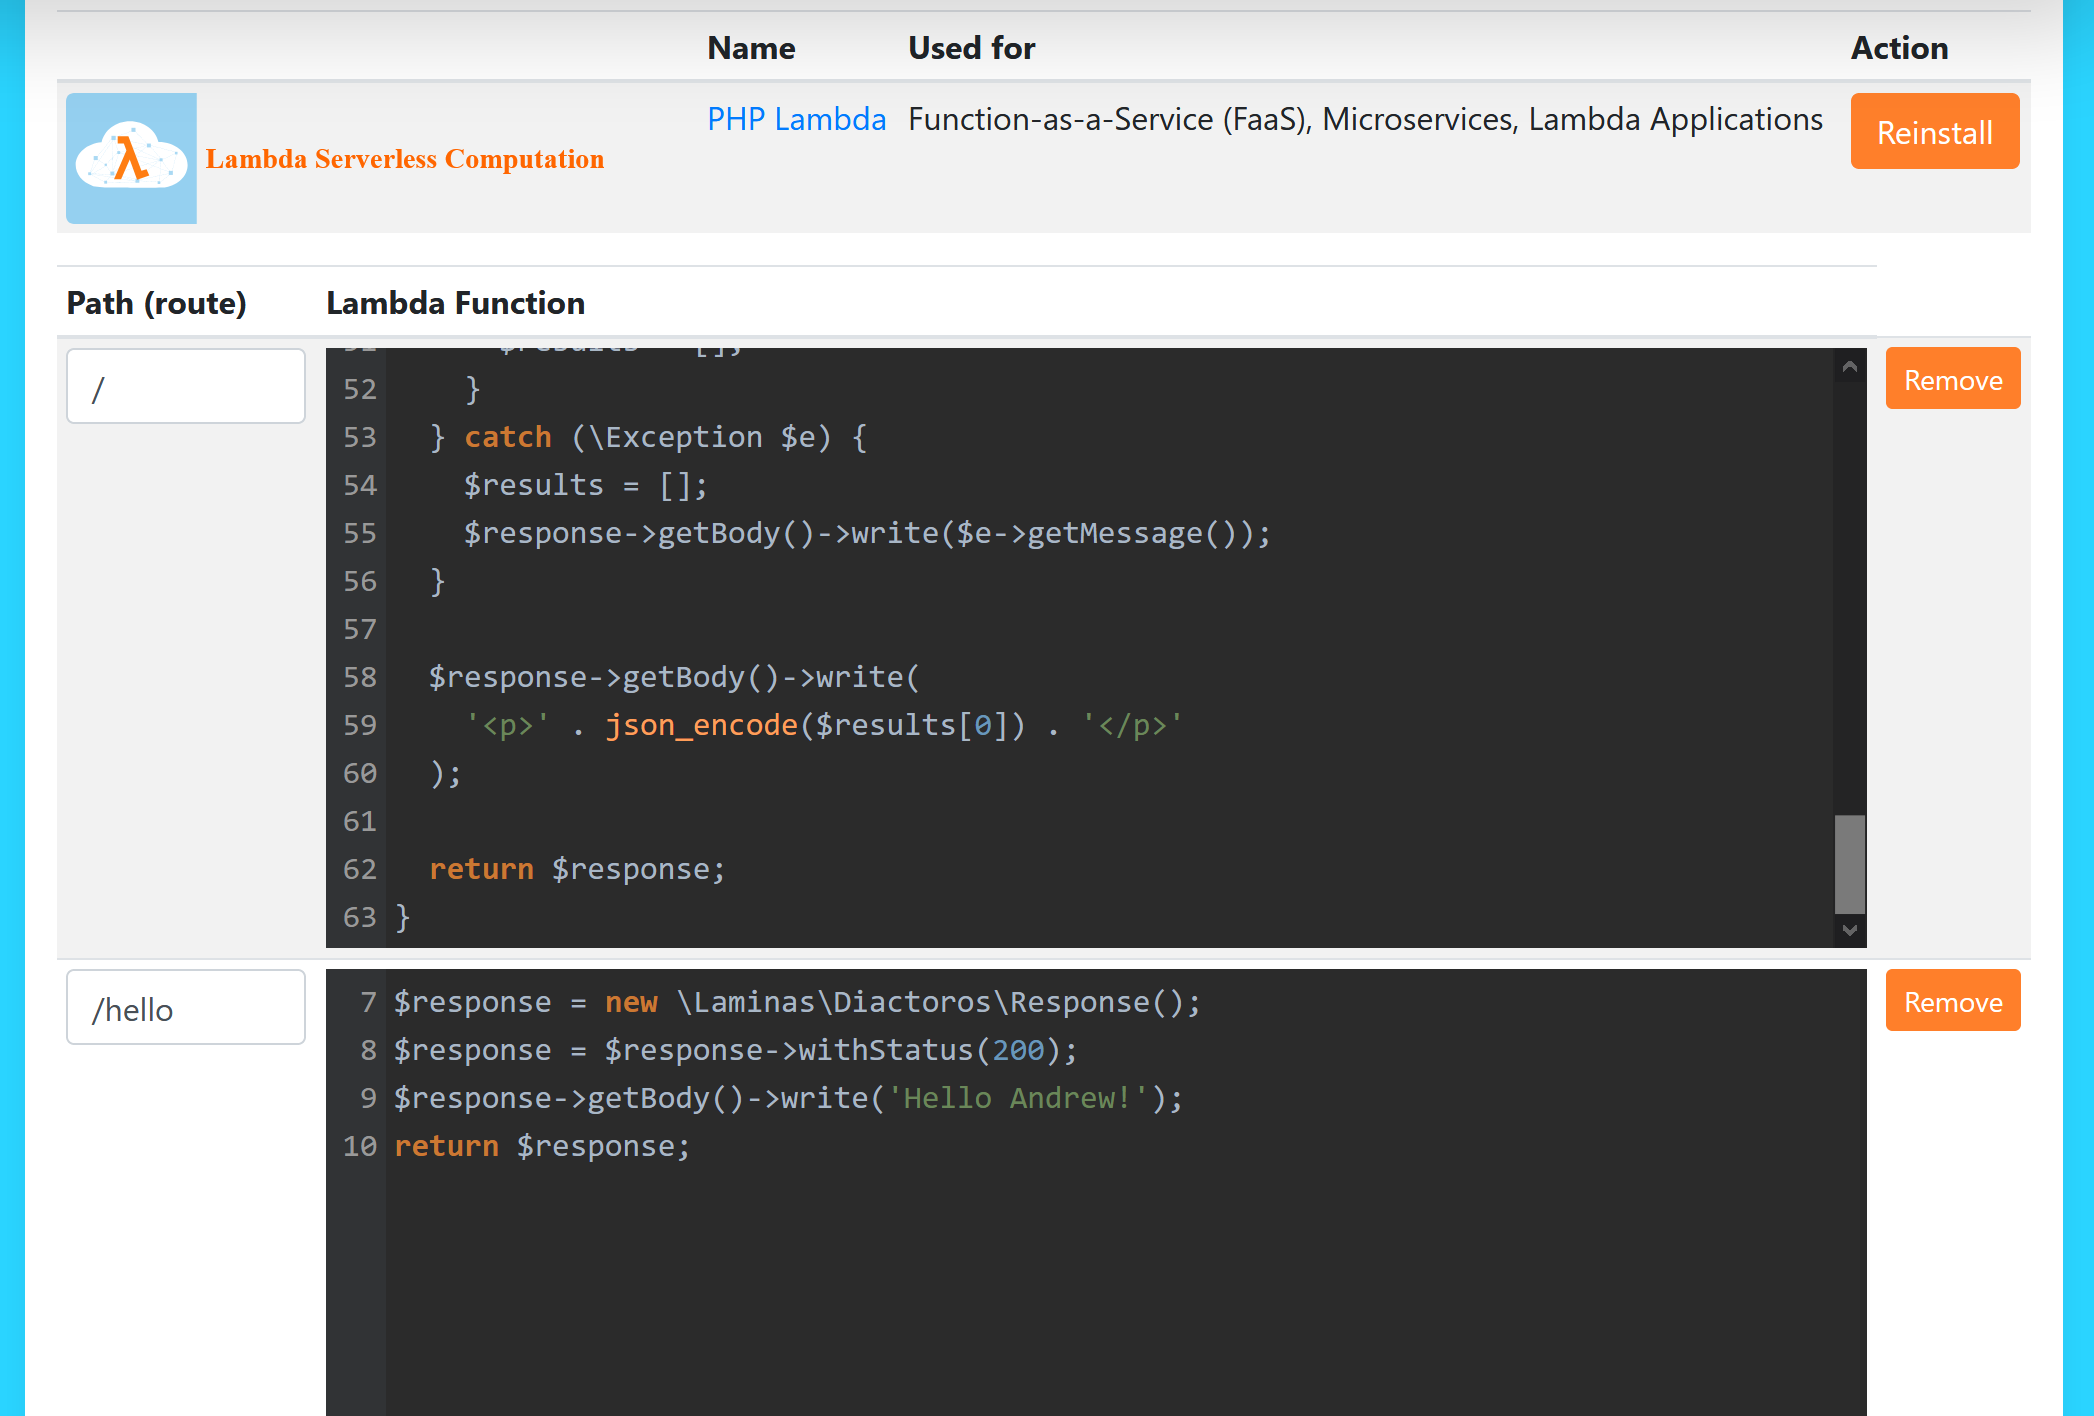
PHP Lambda Cloud
Once you click on the Install button, the system will warn you that it is about to delete any
data in your hosting account before installing your new Lambda Cloud app. If you need to save
any data before you continue, please Cancel the operation and save your data (see Backups).
Once you confirm that you want to publish your new Lambda app, the system will start installing
your application on your hosting account.
Based on the asynchronous framework LightMVC, and PSR-15 Mezzio Middleware (https://docs.mezzio.dev/), the LfPHP Lambda Cloud empowers the PHP developer to create Web endpoints in minutes, by simply adding, through its Web UI, the URL and the body of the Middleware function for each created endpoint. This makes it possible to access all the facilities of a standard PHP application, without having to set up the entire application, and all of its auxiliary services. At the click of one single button, the developer can access SQL and NoSQL databases, a Redis cache server, asynchronous PHP sessions, and all the other facilities one can come to expect in a standard PHP application.
The developer can access the PSR-7 Request and Response objects, the entire Singleton application object, the Pimple service container, the LightMVC PSR-14 Event Dispatcher, which extends the Laminas Event Manager, the Doctrine Entity Manager, the Event Sourcing and CQRS configuration settings, and so much more!
Moreover, the developer can also return an entire HTML/CSS/JS template using his favorite template manager. By default, LightMVC apps allow the developer to choose between three well-known template managers: Plates, Twig, and Smarty.
Note
Please see the LightMVC Framework documentation for more information.
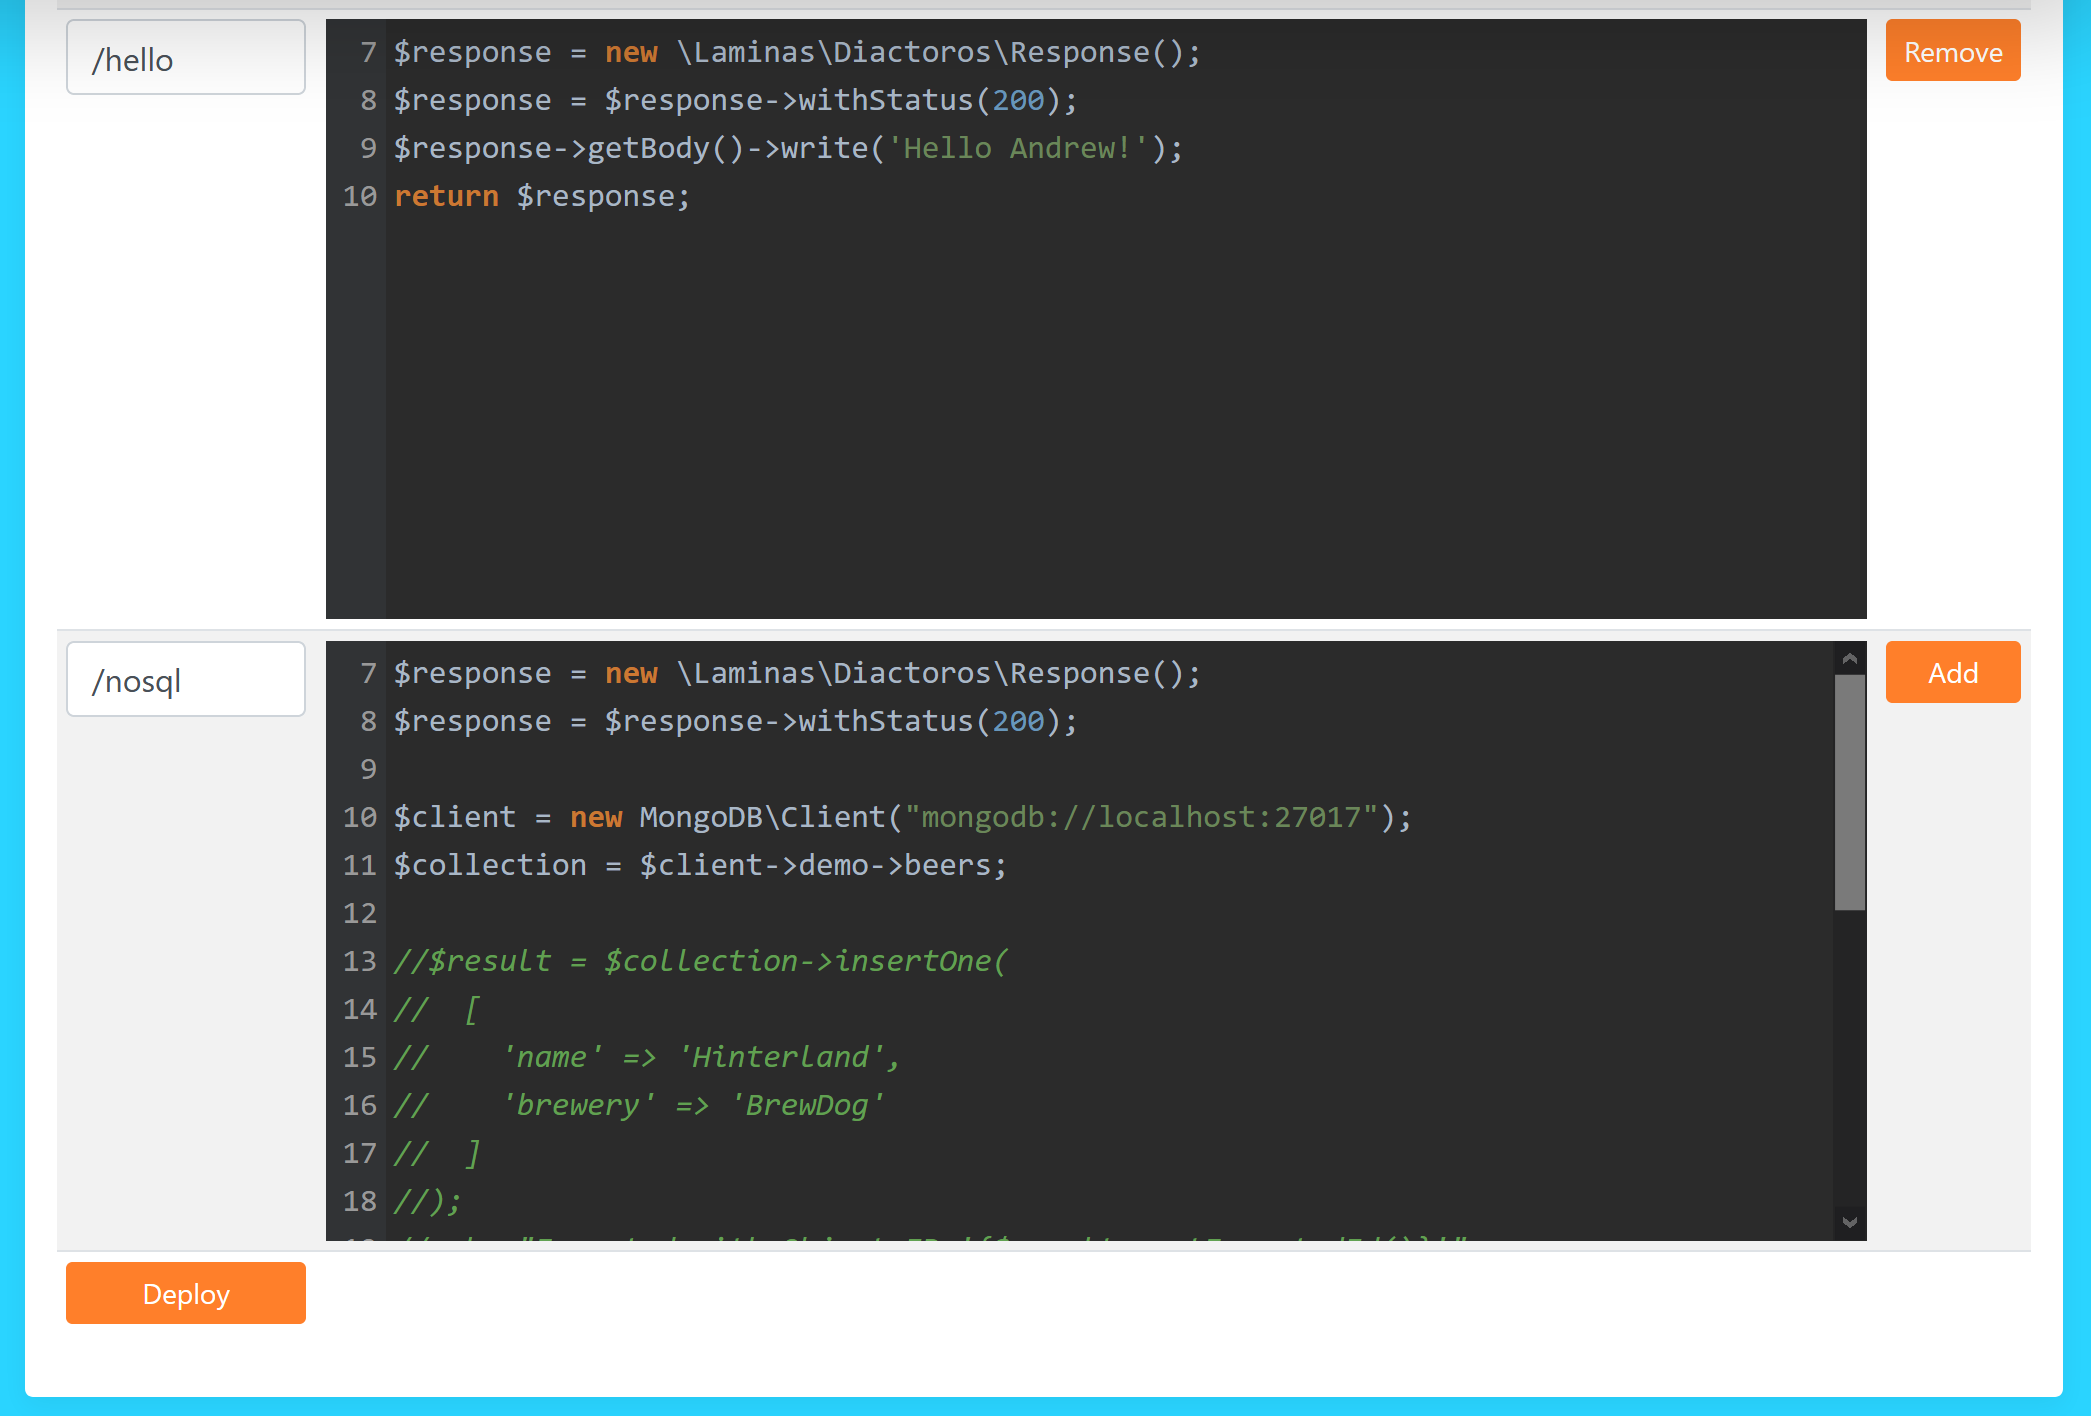
Deploying new Lambda functions is as easy as clicking on the Add button, typing in the new Middleware
function and its URI/URL, and clicking on the Deploy button.
Before deplying the Middleware functions, the system will ask you to confirm that you want to overwrite
the currently deployed functions. If you need to save your previous code, click on Cancel, and create
a Backups of your code before continuing.

Deployment confirmation
Once you are ready to deploy, please proceed, and wait for the confirmation that your new Lambda functions were deployed to the LfPHP Cloud.
Lambda functions deployed
Here are a few examples of Lambda functions that you can use on the LfPHP Cloud.
Firstly, let’s have a look at how to access the pre-installed MariaDB (MySQL) database:
$queryString = $request->getServerParams()['REQUEST_URI'];

if (preg_match('/^\/.+/', $queryString)) {
  return $handler->handle($request);
} else {
  $app = \Ascmvc\Mvc\App::getInstance();

  $serverParams = $app->getRequest()->getServerParams();

  if (isset($serverParams['HTTP_X_REAL_IP'])) {
    $remoteAddr = $serverParams['HTTP_X_REAL_IP'];
  } else {
    $remoteAddr = $serverParams['REMOTE_ADDR'];
  }

  $response = new Laminas\Diactoros\Response();
  $response = $response->withStatus(200);
  $response->getBody()->write(
    '<p>' . strtoupper(
      'This is the NEW root lambda function!'
    ) . '<br /></p>'
  );

  $response->getBody()->write(
    '<p>You have contacted us from IP address '
    . $remoteAddr
    . '!<br /></p>'
  );

  $entityManager = $app->getServiceManager()['dem1'];

  $productsRepository = new \Application\Models\Repository\ProductsRepository(
            $entityManager,
            new \Doctrine\ORM\Mapping\ClassMetadata(
              \Application\Models\Entity\Products::class
            )
        );

  try {
    $result = $productsRepository->find('5');

    if (!is_null($result)) {
      $results[] = $productsRepository->hydrateArray($result);
    } else {
      $results = [];
    }
  } catch (\Exception $e) {
    $results = [];
    $response->getBody()->write($e->getMessage());
  }

  $response->getBody()->write(
    '<p>' . json_encode($results[0]) . '</p>'
  );

  return $response;
}
Secondly, here is an example of how to return a simple Response object:
$response = new \Laminas\Diactoros\Response();
$response = $response->withStatus(200);
$response->getBody()->write(phpversion());
return $response;
Lastly, here is an example of how to access data in a MongoDB instance, and returning it in a Response object:
$response = new \Laminas\Diactoros\Response();
$response = $response->withStatus(200);

$client = new MongoDB\Client("mongodb://localhost:27017");
$collection = $client->demo->beers;

//$result = $collection->insertOne(
//  [
//    'name' => 'Hinterland',
//    'brewery' => 'BrewDog'
//  ]
//);
//echo "Inserted with Object ID '{$result->getInsertedId()}'";

$result = $collection->find();

$bodyContent = '';

foreach ($result as $entry) {
  $bodyContent .= $entry['_id'] . ': ' . $entry['name'] . '<br />' . PHP_EOL;
}

$response->getBody()->write($bodyContent);

return $response;
The PHP Lambda Cloud makes it possible for the developer to build Web pages, API endpoints, or mixed mobile application back end logic in minutes!
For more information, please read our guide on how to deploy PHP Lambda functions to the LfPHP Cloud (https://linuxforphp.com/doc/guides/how-to-create-an-interactive-html-website-using-lfphp-lambda-cloud.pdf).
Domains
The Domains section gives you the option of adding domain names to your hosting account. If you do not already own the domain name that you wish to add to your account, you can buy the domain through our own registrar (it will require that you create an additional registrar account with us). If you do own the domain name, you can simply modify your DNS server and have it point to the IP address that the system will give you once you’ve added the name of the domain in this section.
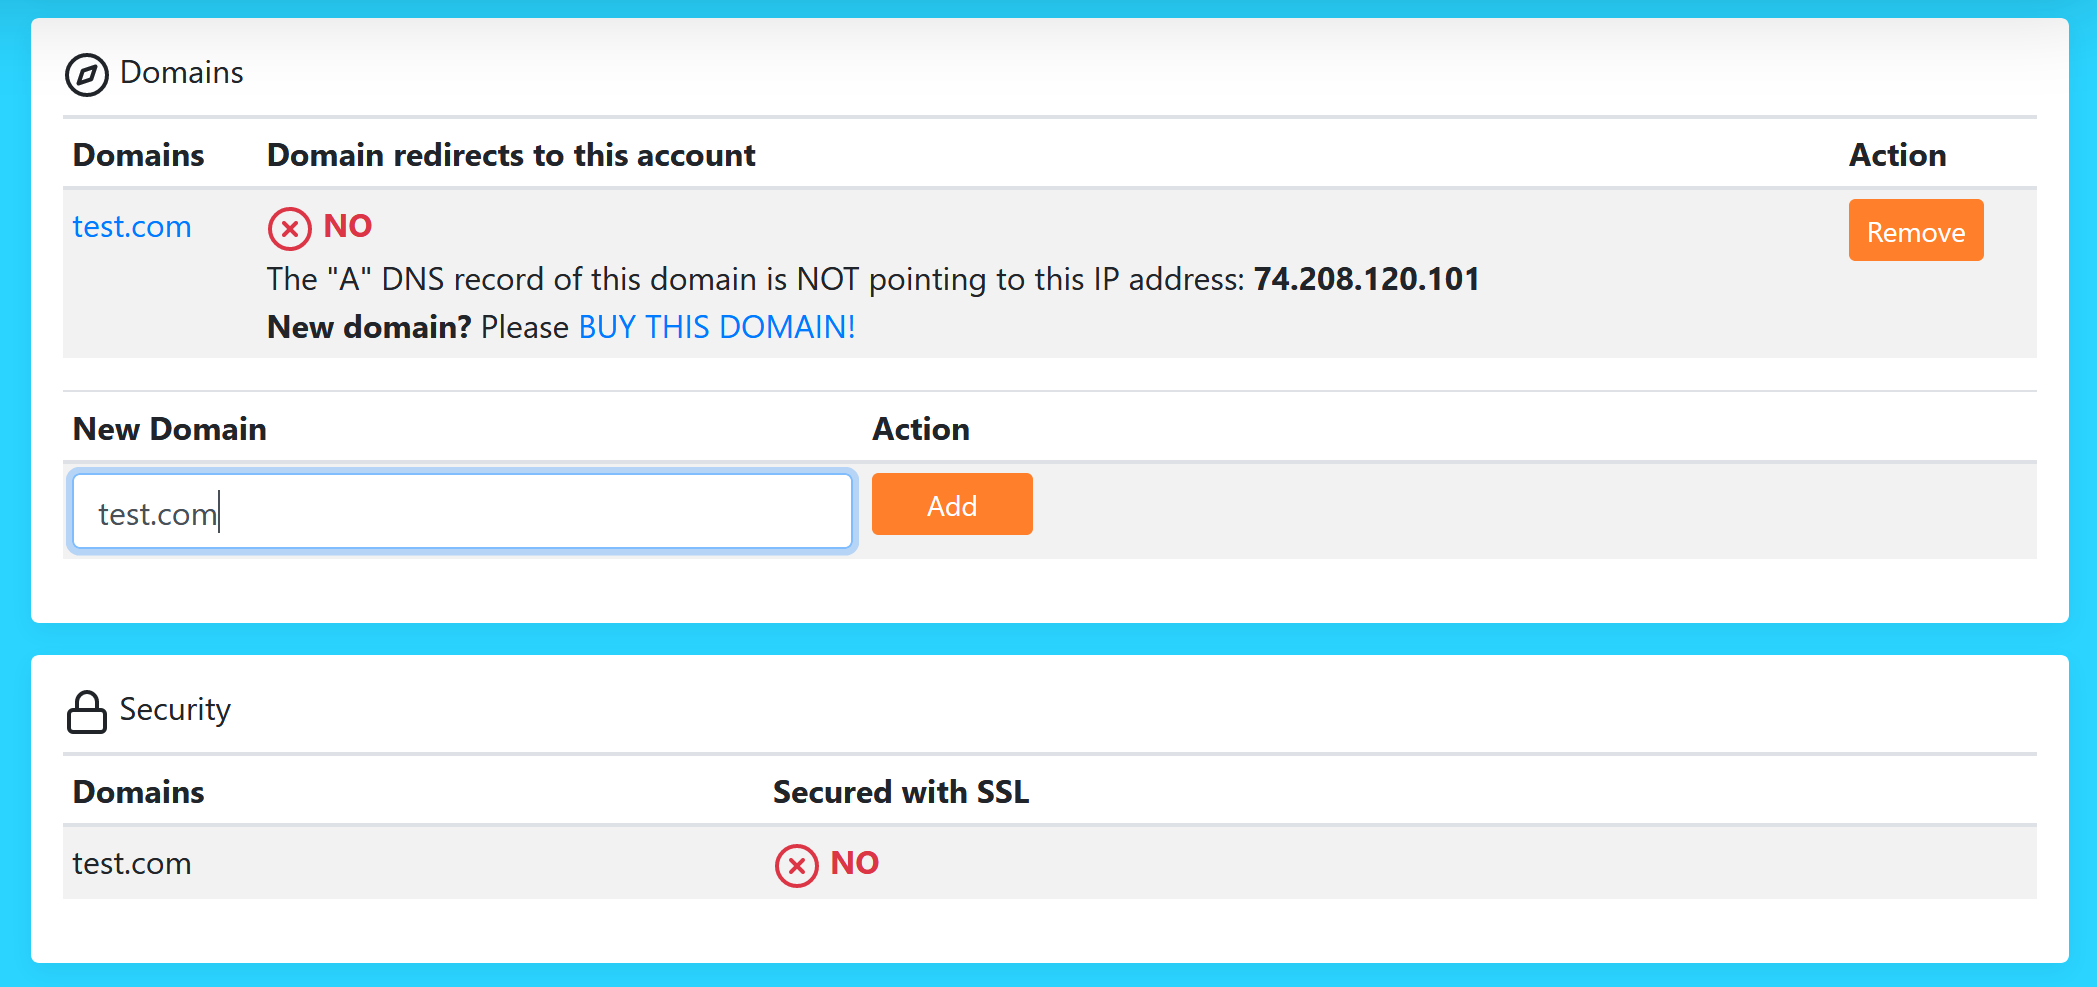
Adding a domain
Note
Once the domain resolves itself to your hosting server, the domain name will automatically be secured with a Let’s Encrypt certificate (see Security). It is also possible to run your domain behind a reverse proxy service like Cloudflare.
Security
The Security section informs you if your domain names have been secured, or not, with a Let’s Encrypt certificate.

Security section
If you have made sure that the domain name resolves itself correctly to your hosting server (see Domains), then the domain name should automatically be secured. If not, please contact our customer service.
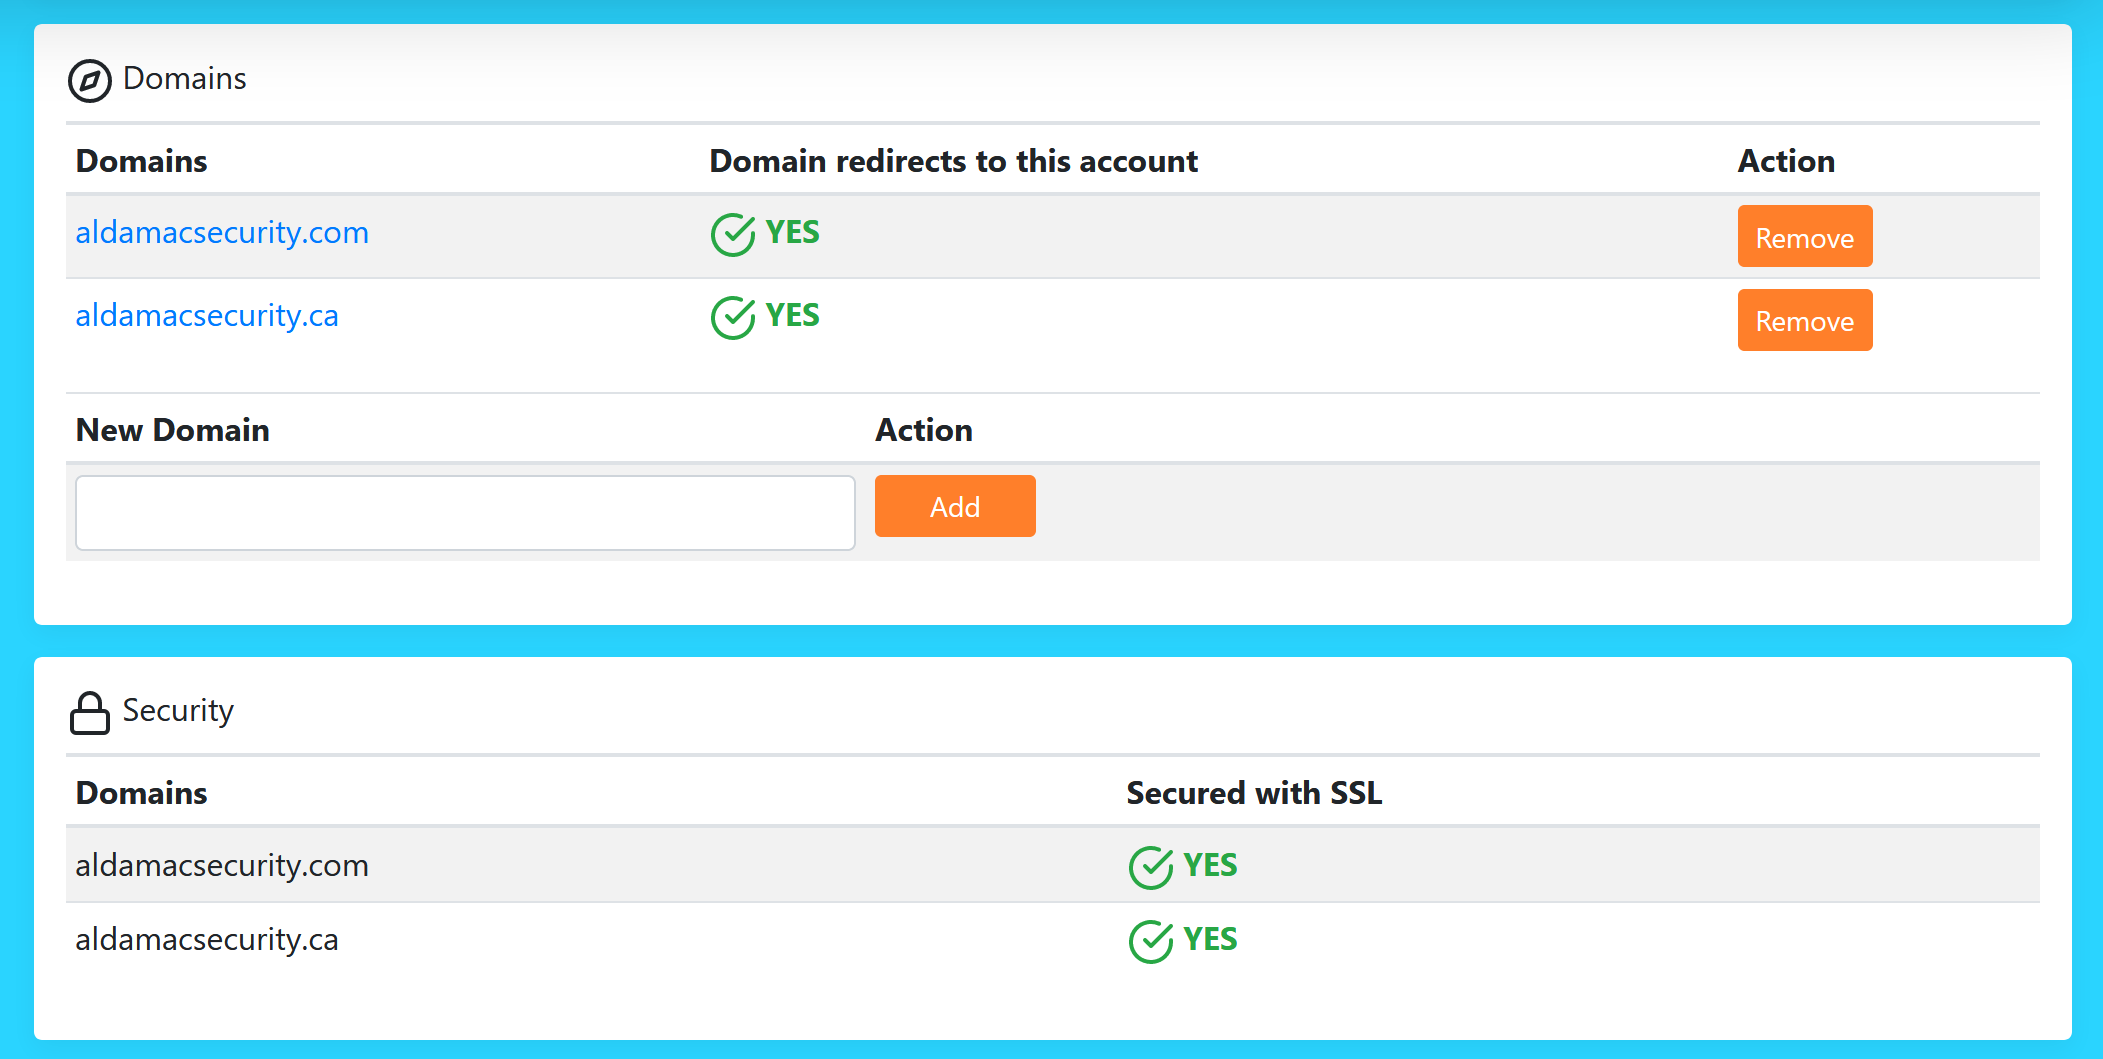
Domains were secured
Email Accounts
The Email Accounts section gives you the option of adding email accounts to your hosting account. In order
to add, delete, or modify your email accounts, you can click on the Email Us button. Once the email accounts
are added to your hosting plan, they will be displayed in this section of the page, with links to the Webmail log in
page, thus allowing you to read your email from anywhere in the World. It is also possible to set up a mail client, like
Thunderbird or your mobile phone’s mail application, in order to receive your email on a specified device.
The ‘General Information’ sub-section gives you information on how many email accounts are still available for your hosting plan, and offers you an easy way to modify your email accounts at any given time.
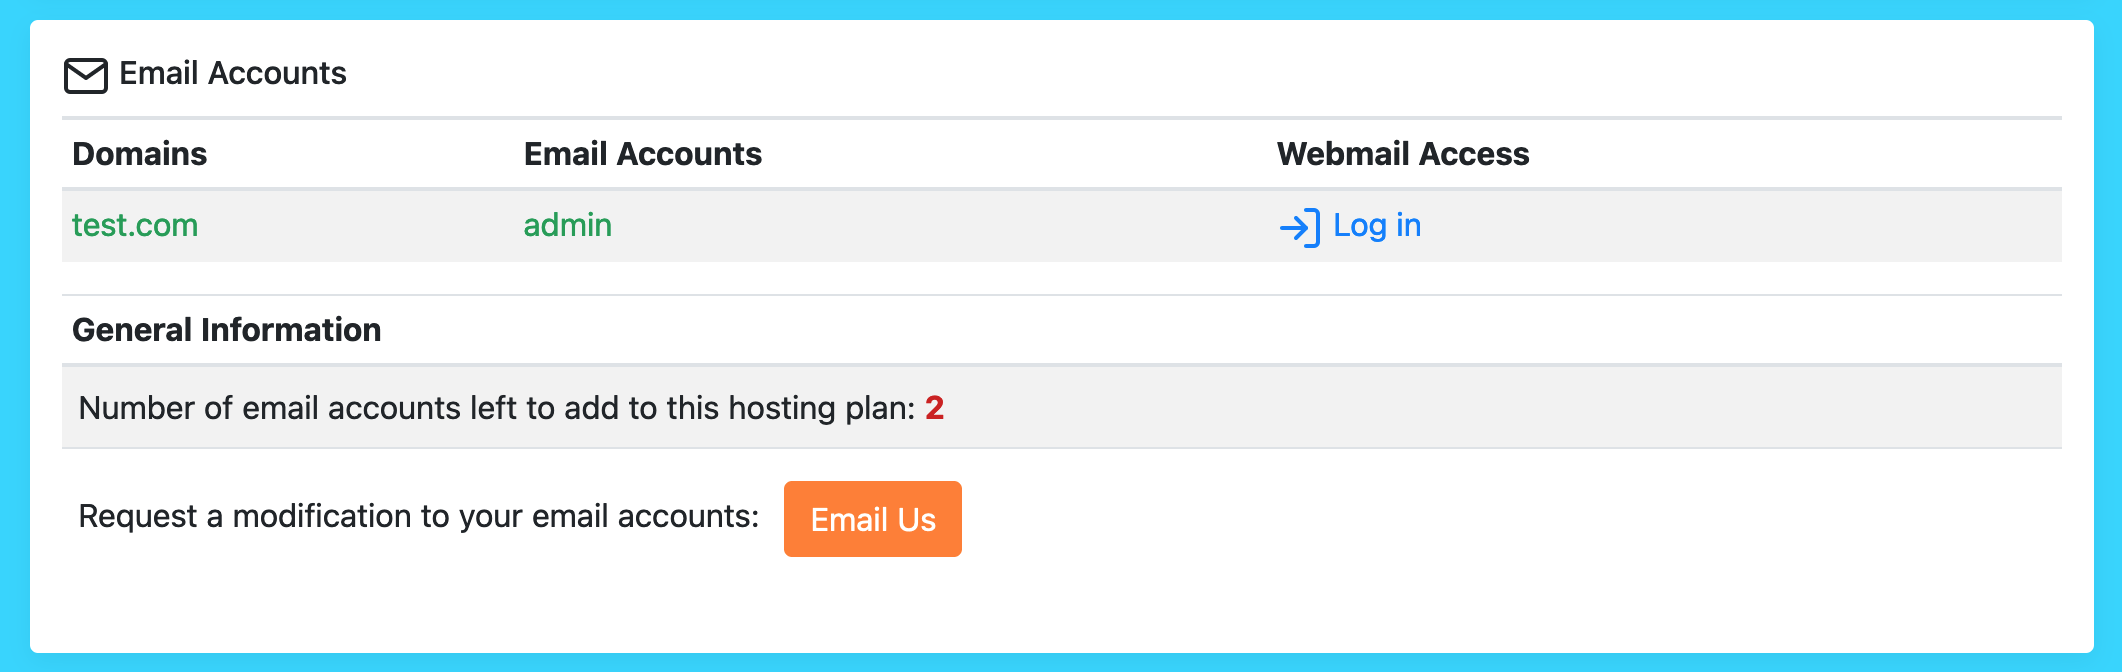
List of email accounts associated to the current hosting account
Note
Once you receive an email from our customer services, you will have all of the necessary instructions to get the email accounts up and running. For example, the included instructions will tell you how to make sure that the MX record for your email domain is set to the IP of our mail servers.
Access Tokens
The Access Tokens section lets you add security tokens in order to deploy apps to your hosting server directly from your computer’s CLI, using the Linux for Composer tool. Simply add an IP address in order to deploy your application from that specific IP address.
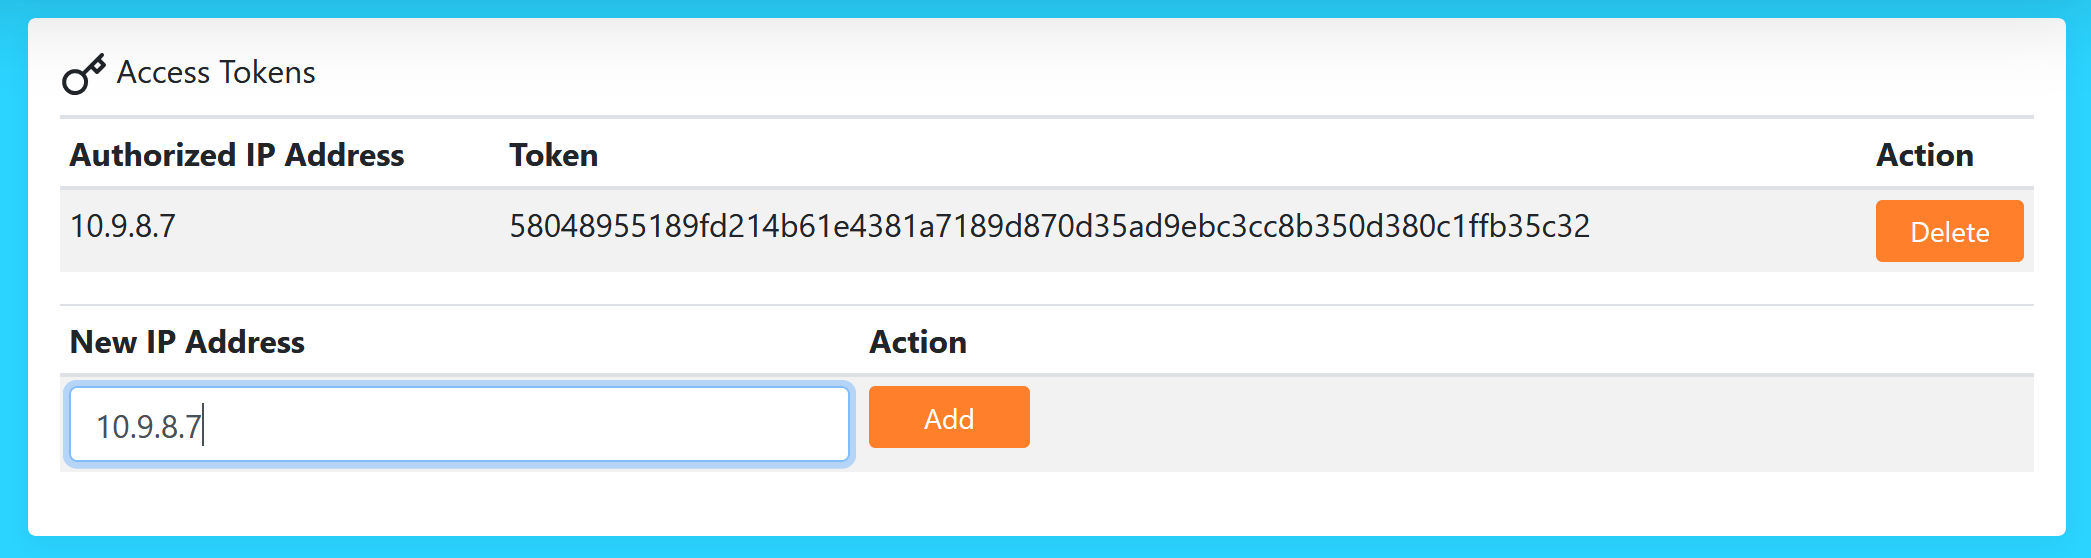
Adding an access token
For more information, please read our guide on how to deploy Docker apps to the LfPHP Cloud using Linux for Composer (https://linuxforphp.com/doc/guides/how-to-use-linux-for-composer-to-deploy-to-the-cloud.pdf).
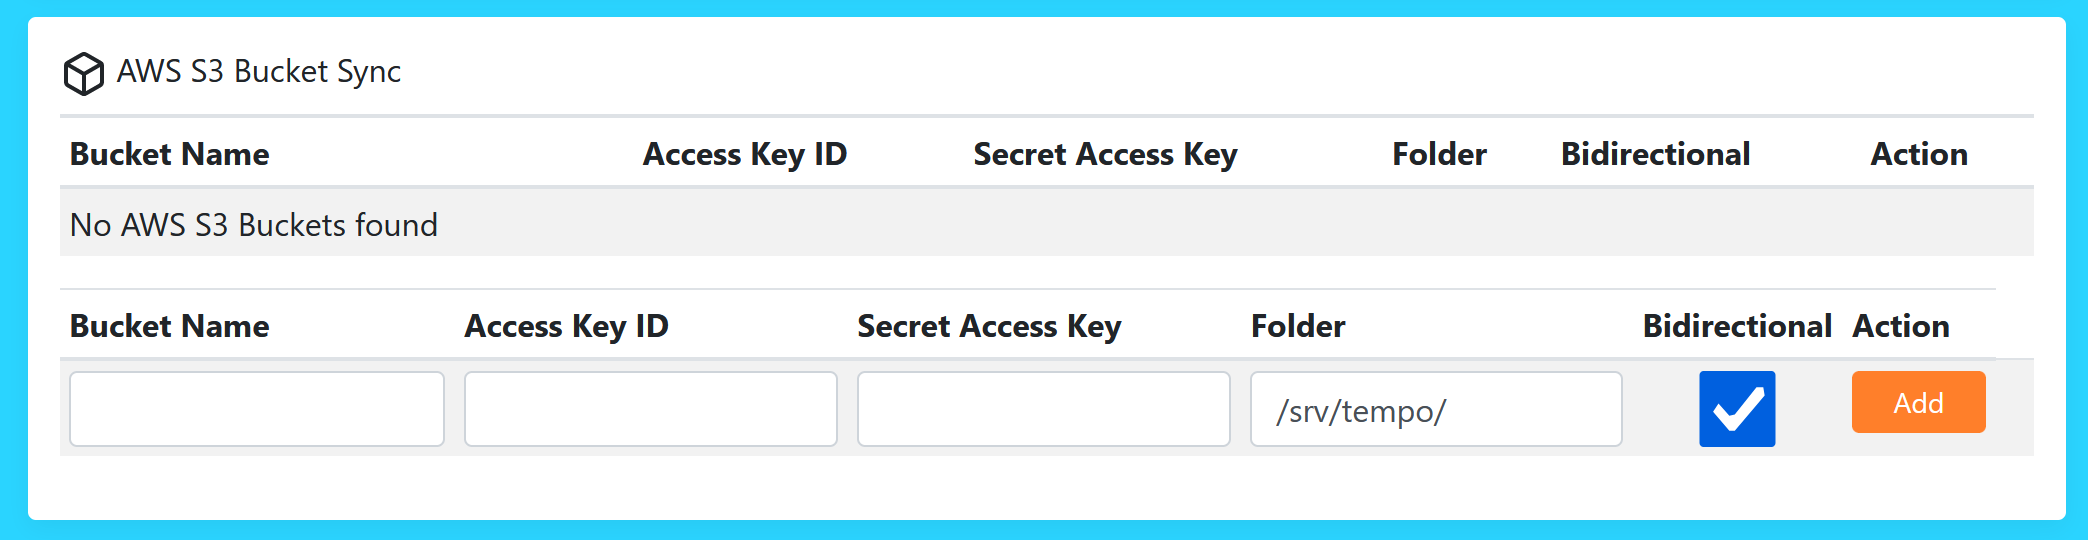
AWS S3 Bucket Sync
The AWS S3 Bucket Sync section lets you set up a folder that will sync itself with an AWS S3 bucket.
The AWS S3 Bucket Sync section
In order to add a new synced folder to your hosting account, add the name of your S3 bucket, the Access Key ID,
the secret access key, the destination folder on your hosting account (the FileBrowser’s root folder is /srv/tempo/),
and check or uncheck the bidirectional feature.

Adding an AWS S3 Bucket
To learn how to set up an S3 bucket, and configure the IAM access key, please see the AWS Documentation for S3 Buckets, and the AWS Documentation for IAM.
The destination folder is where you will store the synced folder. The synced folder is where you will find the files that will
be downloaded from the S3 bucket. When accessing files through the FileBrowser, the root folder is /srv/tempo/,
which is the default destination folder to store the synced folder. The destination folder can be changed according to your needs.
The bidirectional feature allows you to turn on (default) or off file mirroring. If turned on, this feature will allow you to easily back up all of your files to your S3 bucket.
Note
Please note that the bidirectional feature NEVER deletes files in the S3 bucket. A manual intervention inside your S3 bucket will be necessary in order to delete unwanted files.
Once you click on the Add button, the newly added folder will appear within a few seconds.

The newly added AWS S3 Bucket Sync folder
By default, the LfPHP Cloud will sync the contents of the new folder with your AWS S3 bucket every hour. The new cron
job can be found in the crons.hourly file, which is located in the crons folder. Please see the FileBrowser section.
The Crons folder
The new cron can be modified to better suit your needs by cutting and pasting the /srv/awss3synccron command to another
cron file, thus allowing you to change how frequently the folder will be synced with your AWS S3 bucket.
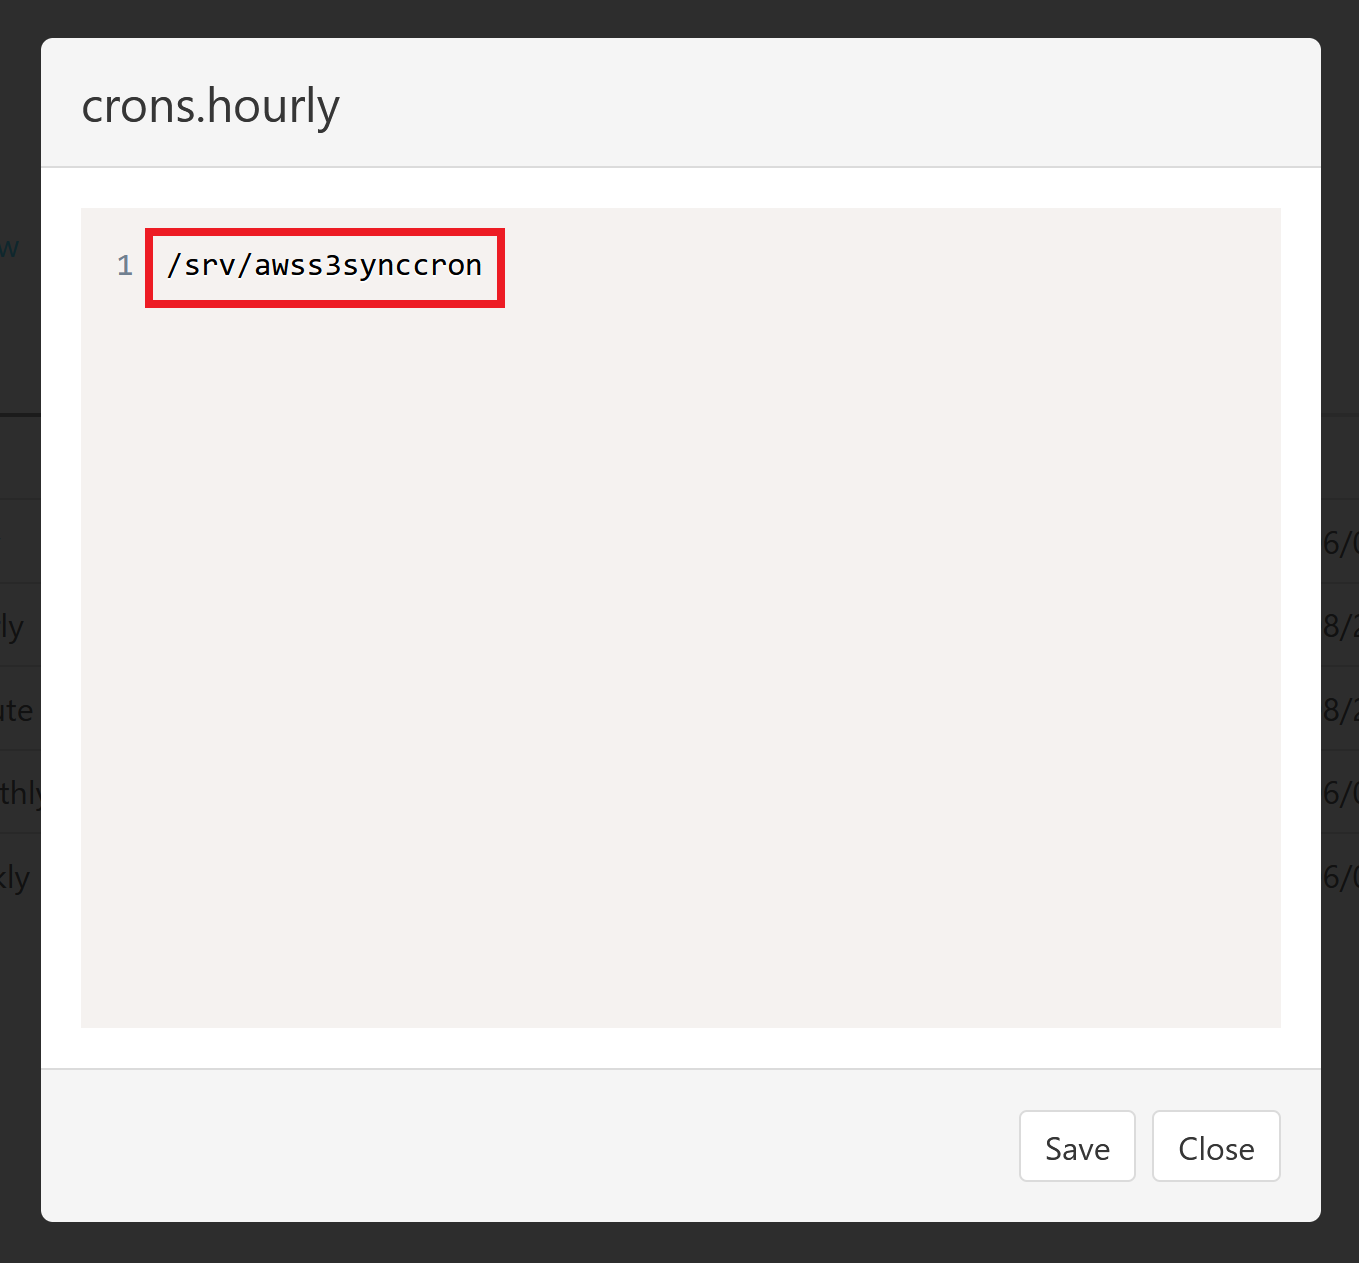
The AWS S3 Bucket Sync cron job
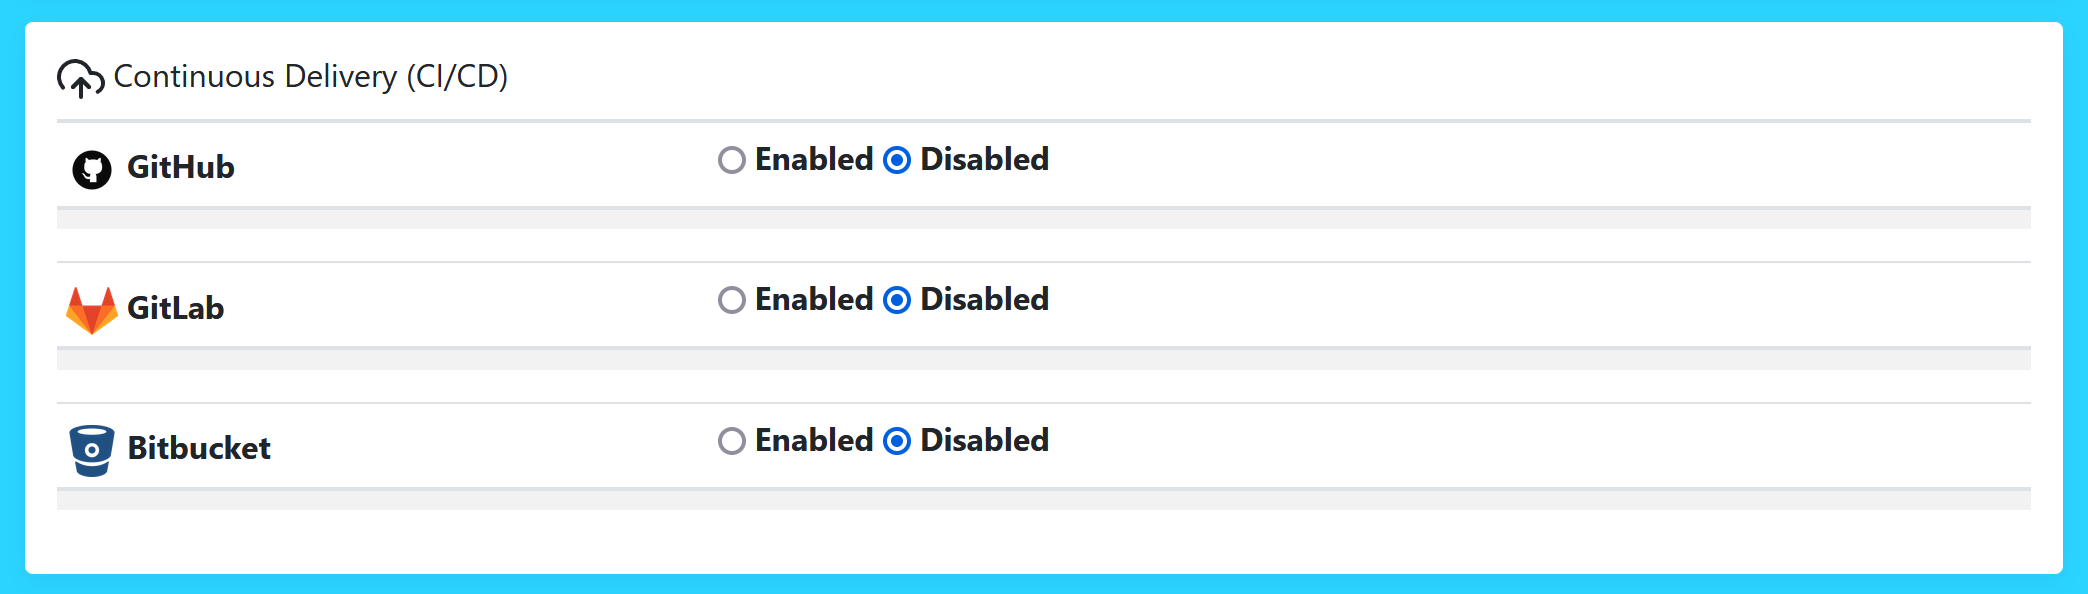
Continuous Delivery (CI/CD)
The Continuous Delivery section lets you add security tokens in order to deploy apps from GitHub, GitLab, or Bitbucket, using webhooks and the Linux for Composer Helper Library.
Continuous Delivery section
Simply click on the Enabled radio button for the service for which you want to set up a deployment
webhook. From there, you can create the webhook in the code repository’s settings in order to start
deploying your app automatically to your hosting account.
To disable the access, click on the Disabled radio button. If you re-enable the access,
you will get a new token, and you will have to update the secret key of your repository’s webhook.
Note
Only Push events on the Master (or Main) branch will be deployed, and those requests will receive a 201 Created response on successful deployment. All other events and branches will be ignored, and those requests will receive a 204 No content response.
Once the webhook is set up correctly, webhook requests from the repository will be processed, and the
LfPHP Cloud deployment manager will look for a linuxforcomposer.json file at the root of your
repository’s Master (or Main) branch in order to begin deployment of your application.
To find a few linuxforcomposer.json file templates that can help you get started, please visit
our repository at https://github.com/linuxforphp/lfphp-cloud-templates.
For more information on Linux for Composer, please read our guide on how to deploy Docker apps to the LfPHP Cloud using Linux for Composer (https://linuxforphp.com/doc/guides/how-to-use-linux-for-composer-to-deploy-to-the-cloud.pdf).
GitHub
To set up a webhook for a repository hosted on GitHub, start by enabling the endpoint in your LfPHP Cloud hosting account:

Enabling the GitHub endpoint
In your GitHub repository’s settings, add a webhook by pasting in the endpoint URL, the secret
token key, and clicking the Save button. All of the other default settings should not be modified.
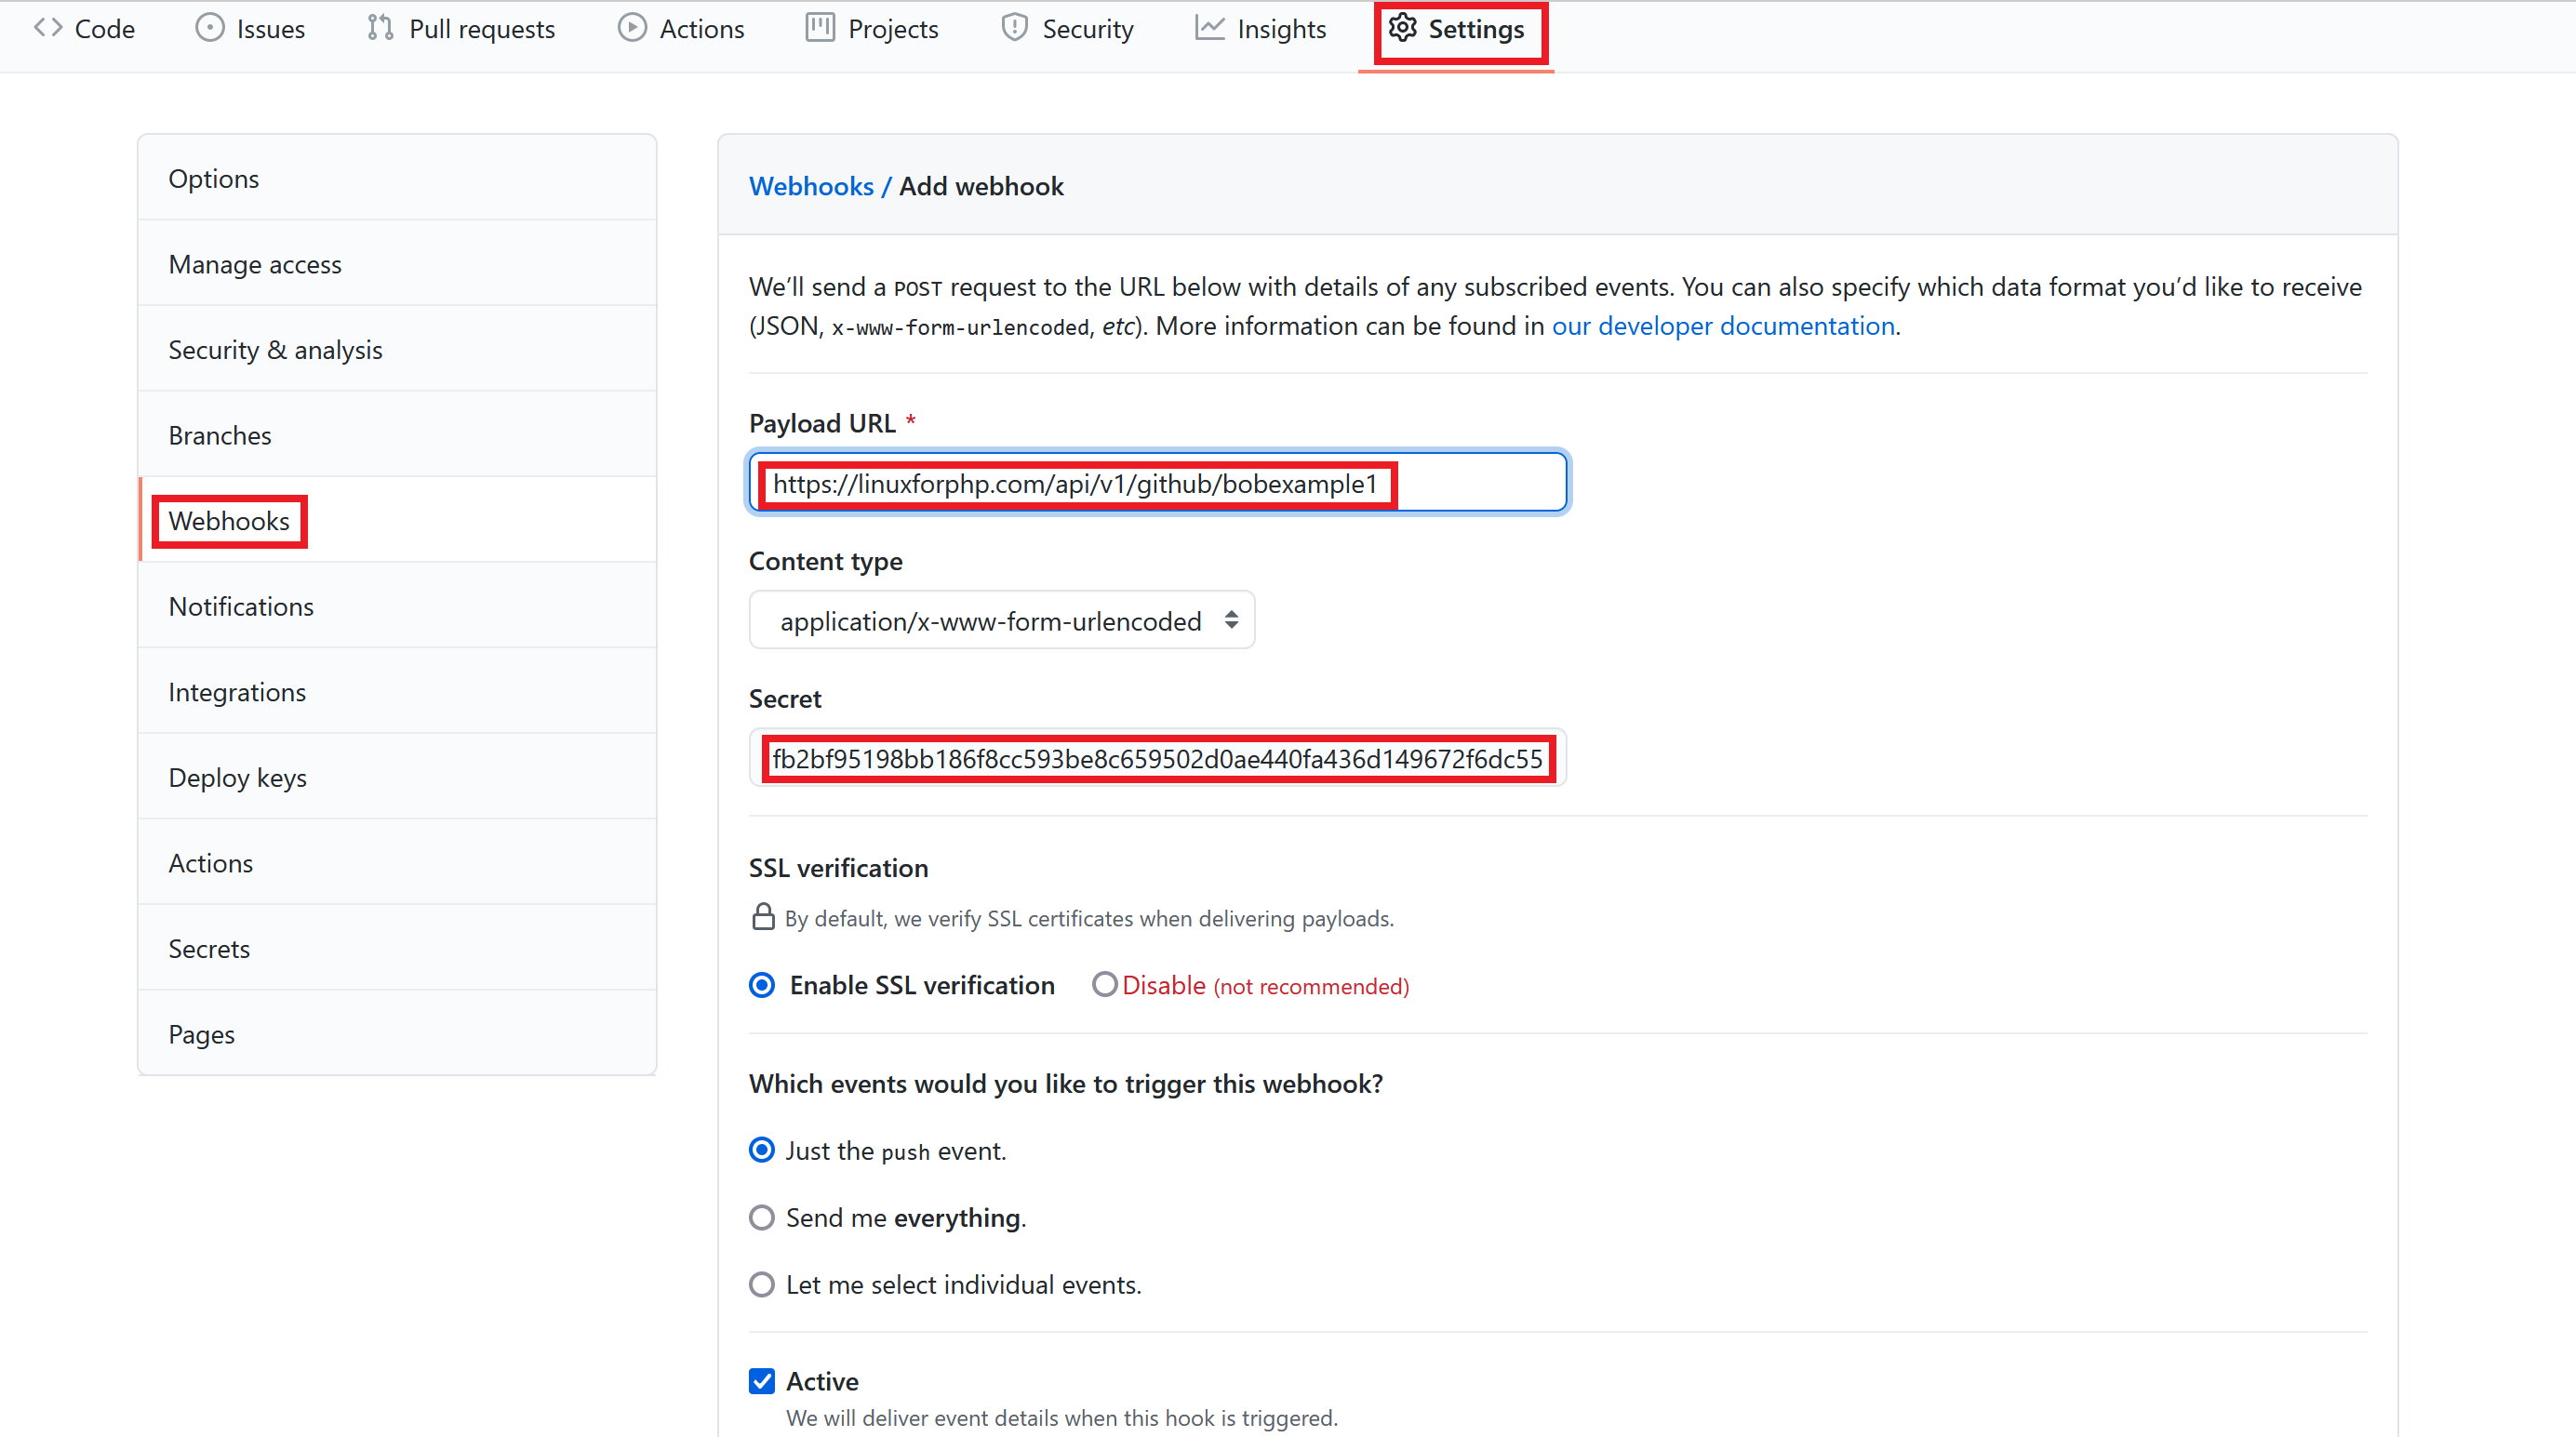
Adding the GitHub webhook
GitLab
To set up a webhook for a repository hosted on GitLab, start by enabling the endpoint in your LfPHP Cloud hosting account:
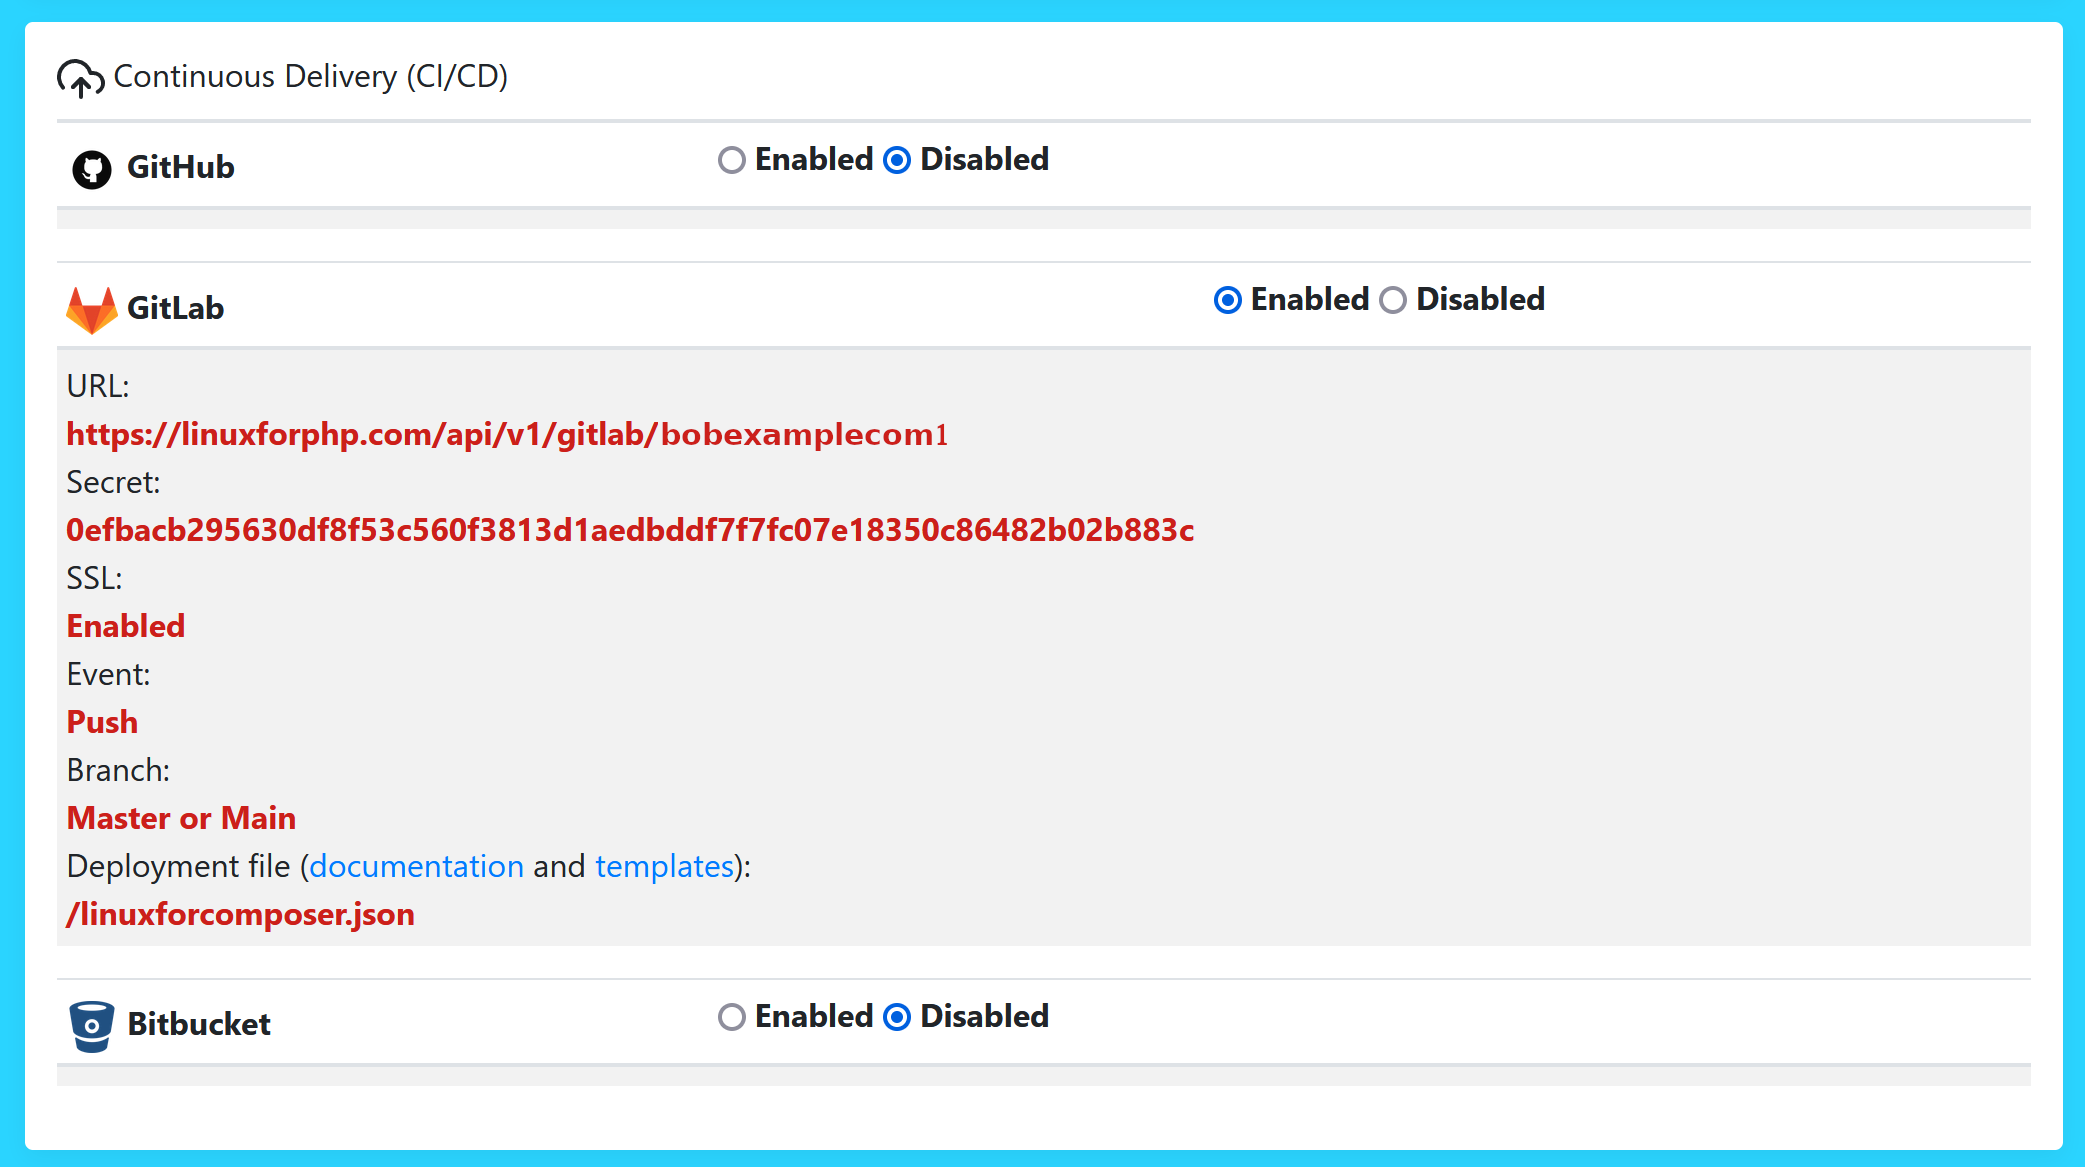
Enabling the GitLab endpoint
In your GitLab repository’s settings, add a webhook by pasting in the endpoint URL, the secret
token key, and clicking the Save button. All of the other default settings should not be modified.
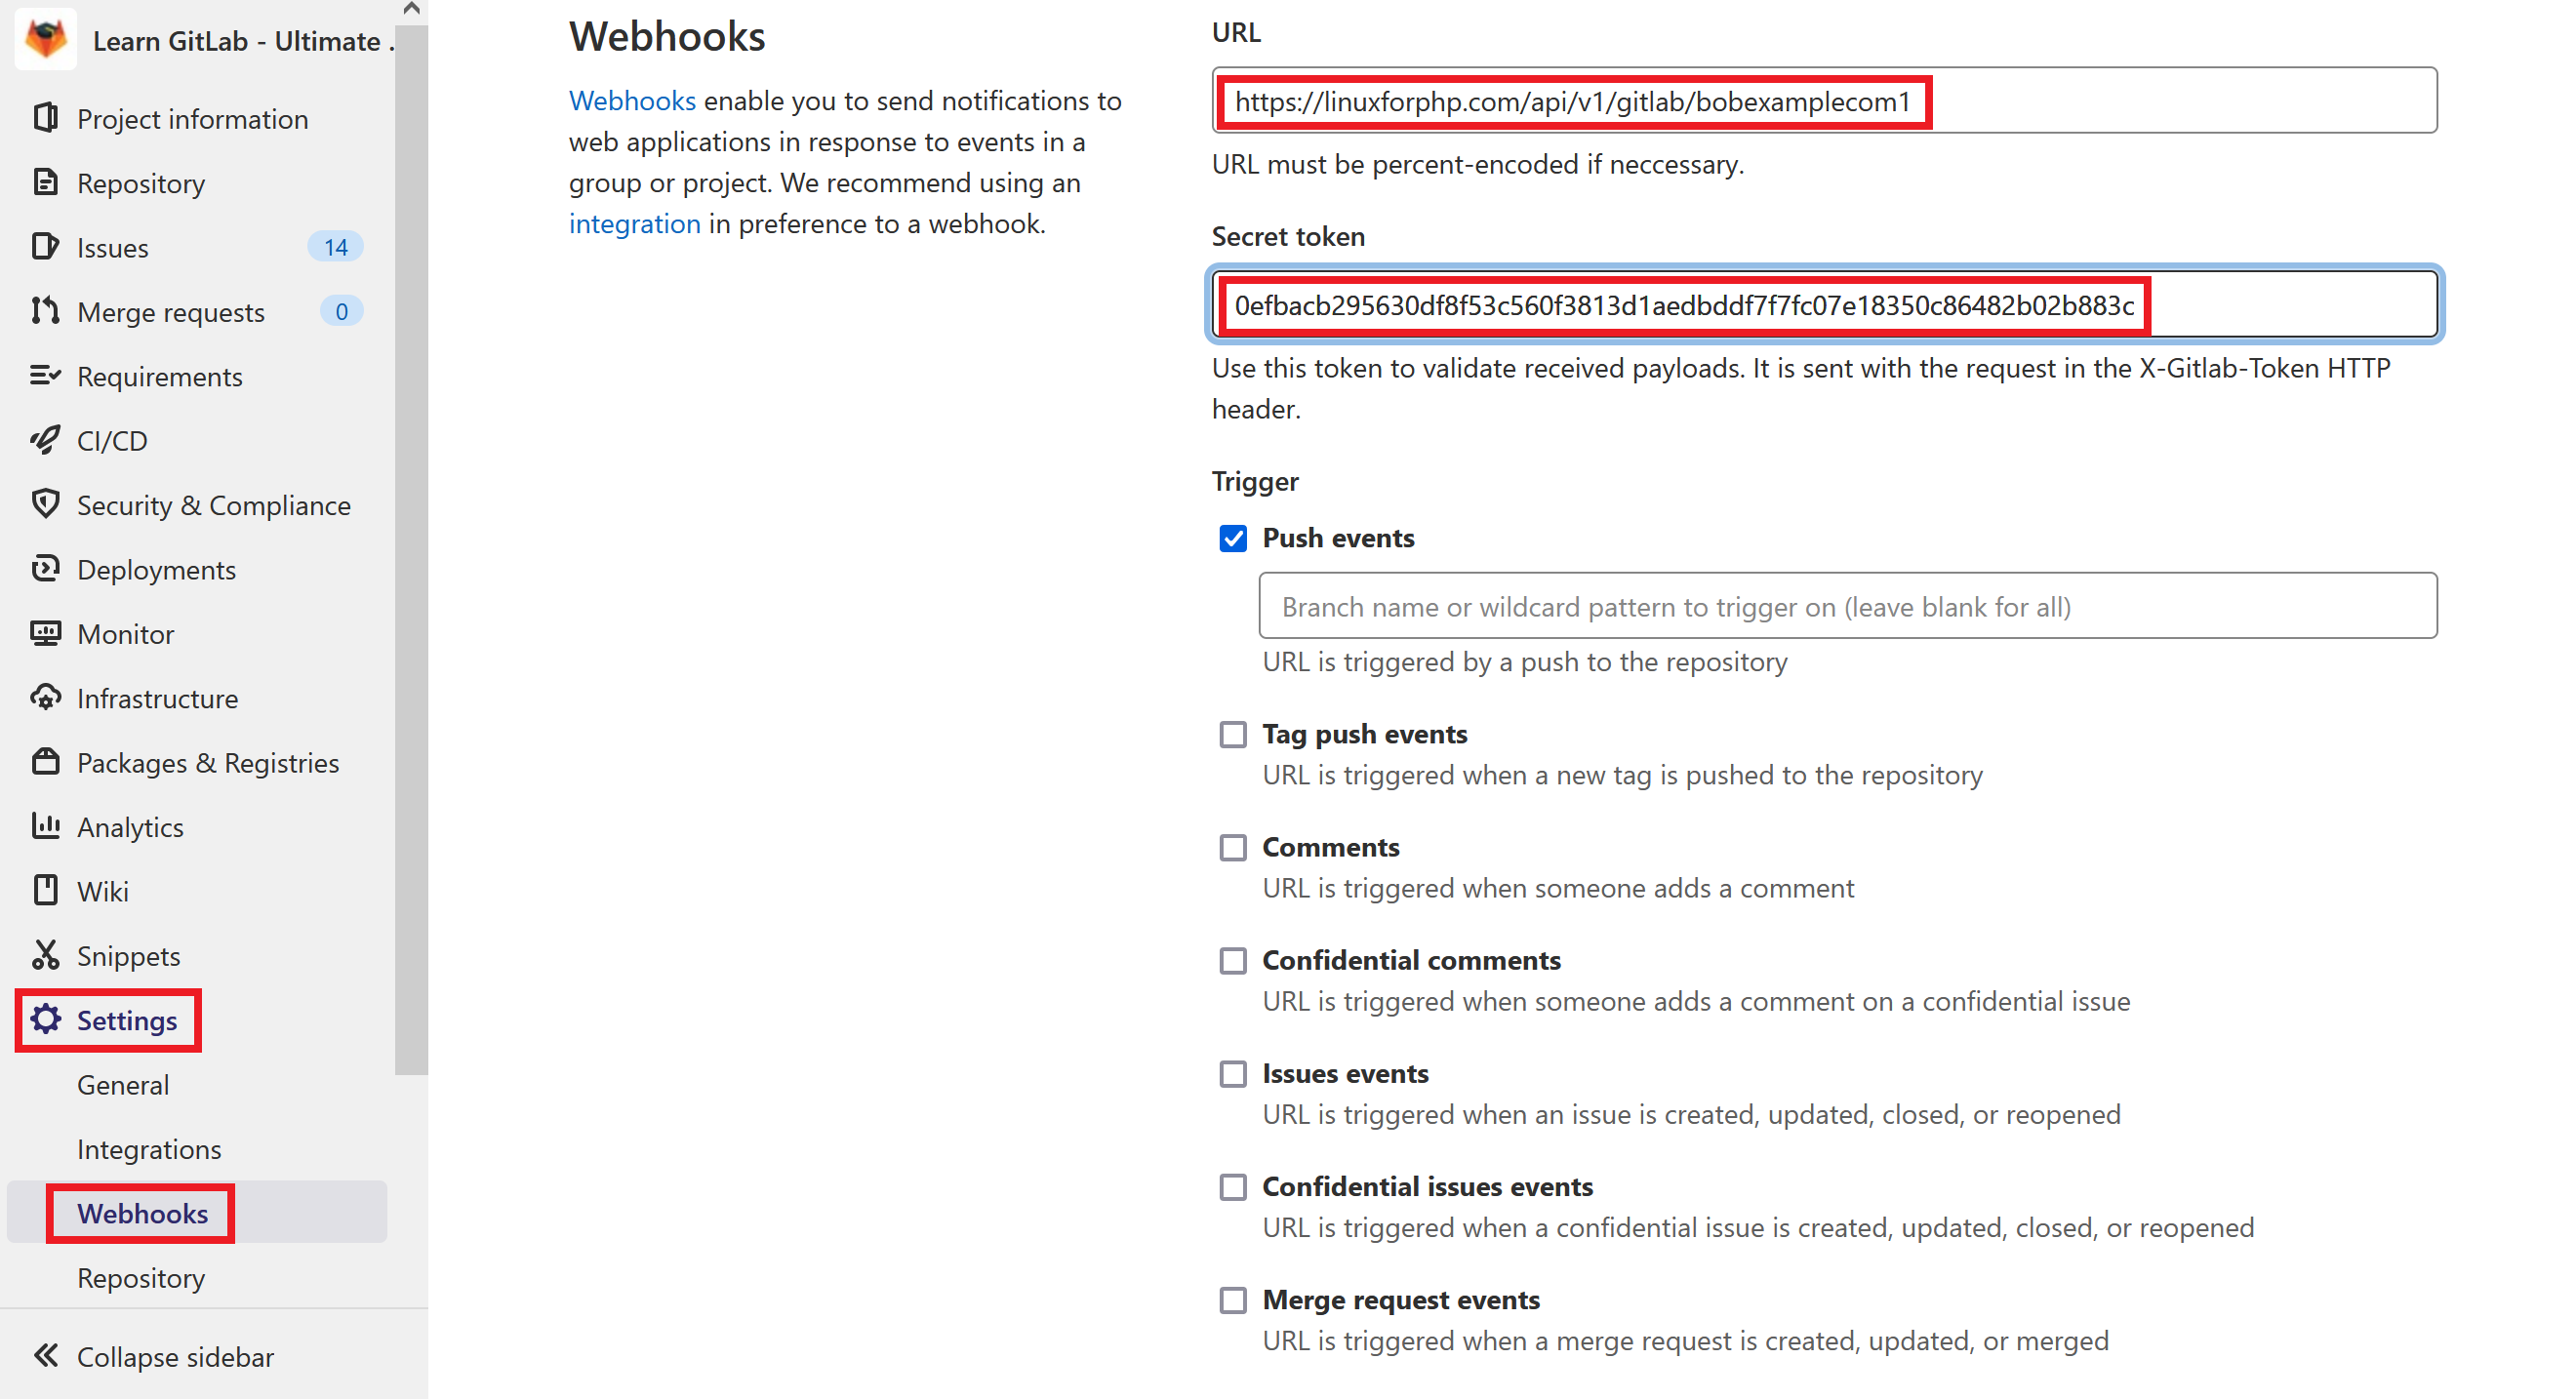
Adding the GitLab webhook
Bitbucket
To set up a webhook for a repository hosted on Bitbucket, start by enabling the endpoint in your LfPHP Cloud hosting account:
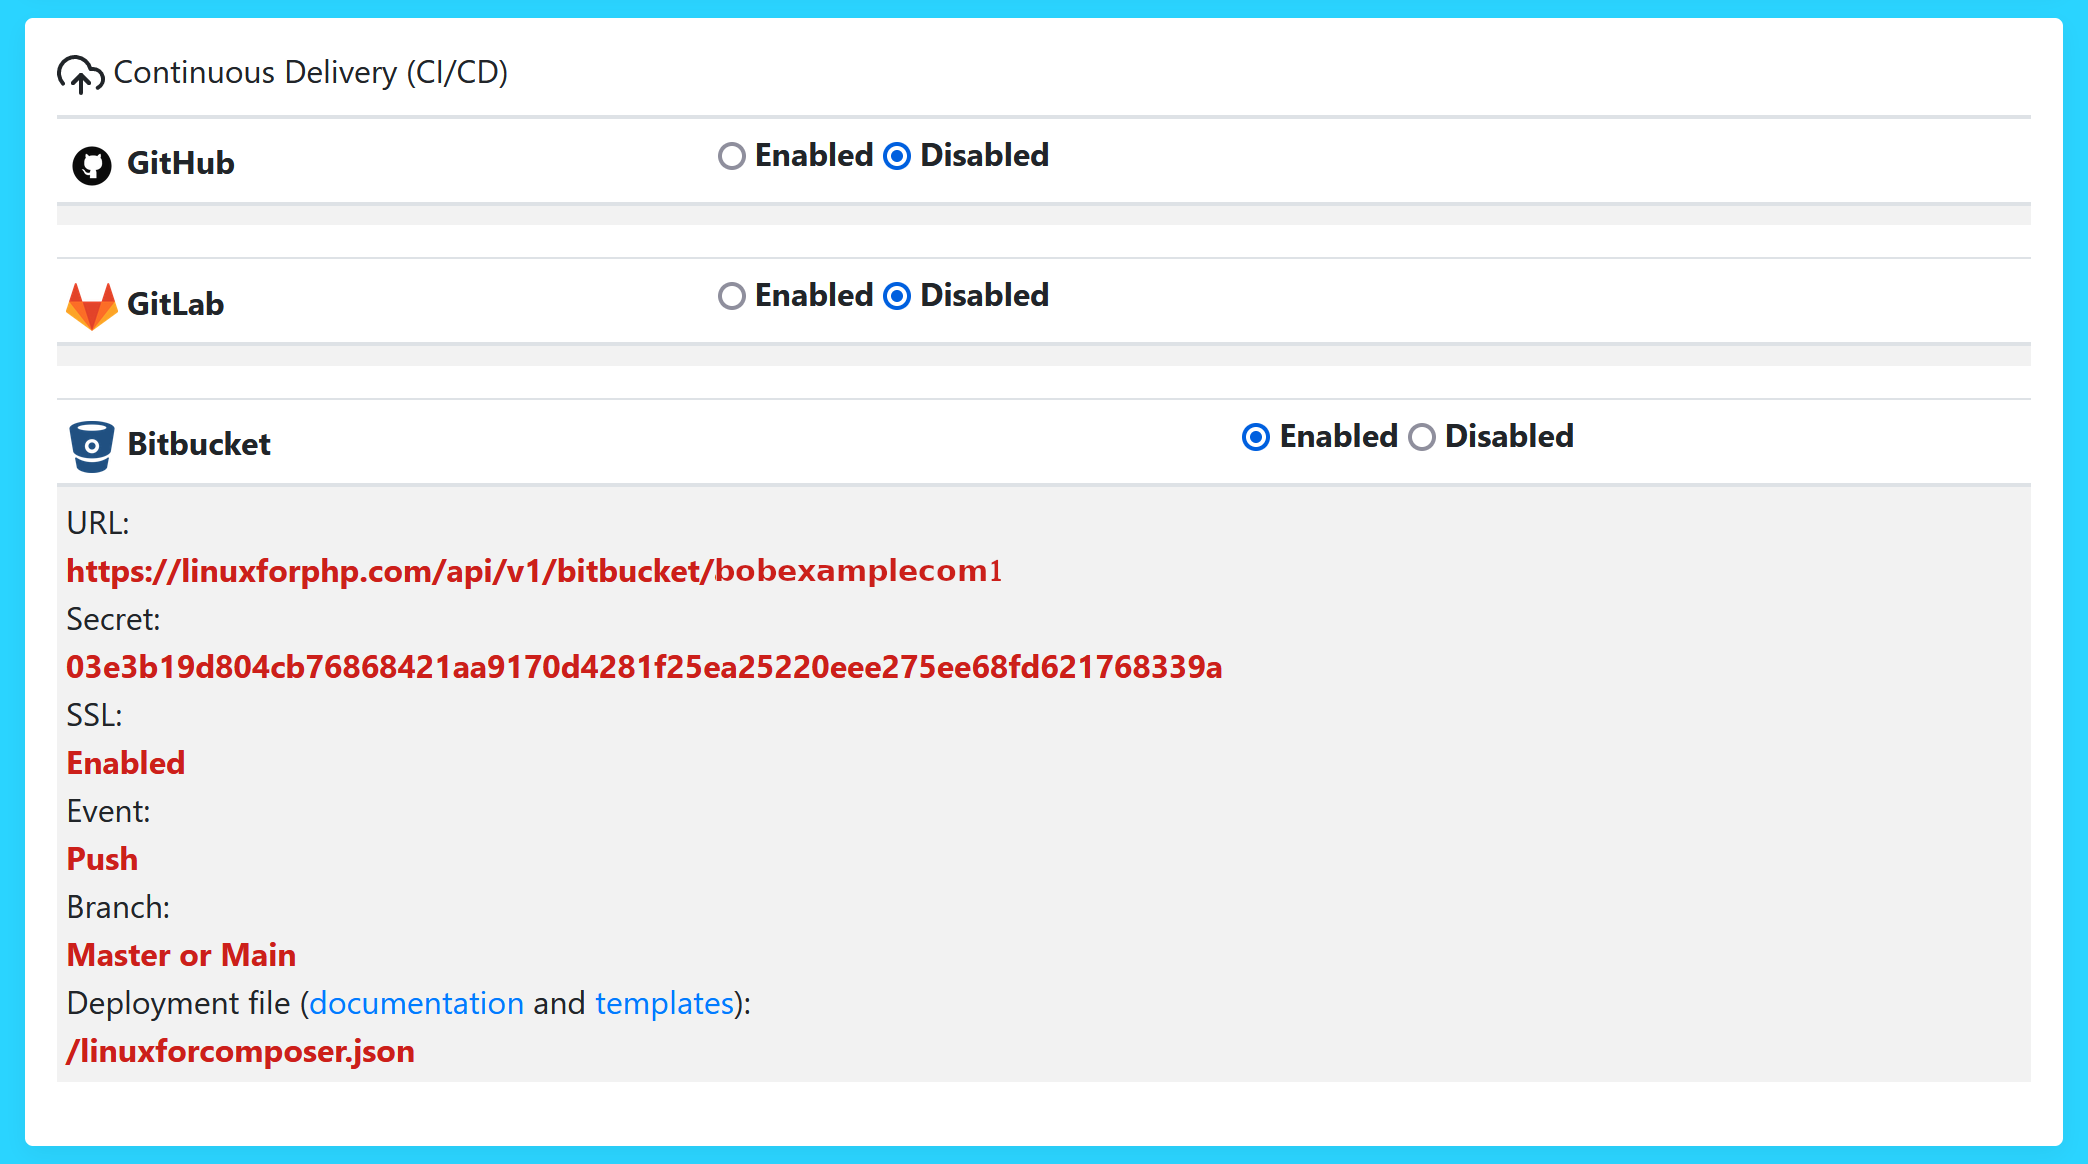
Enabling the Bitbucket endpoint
In your Bitbucket repository’s settings, add a webhook by pasting in the endpoint URL, and
clicking the Save button. All of the other default settings should not be modified.
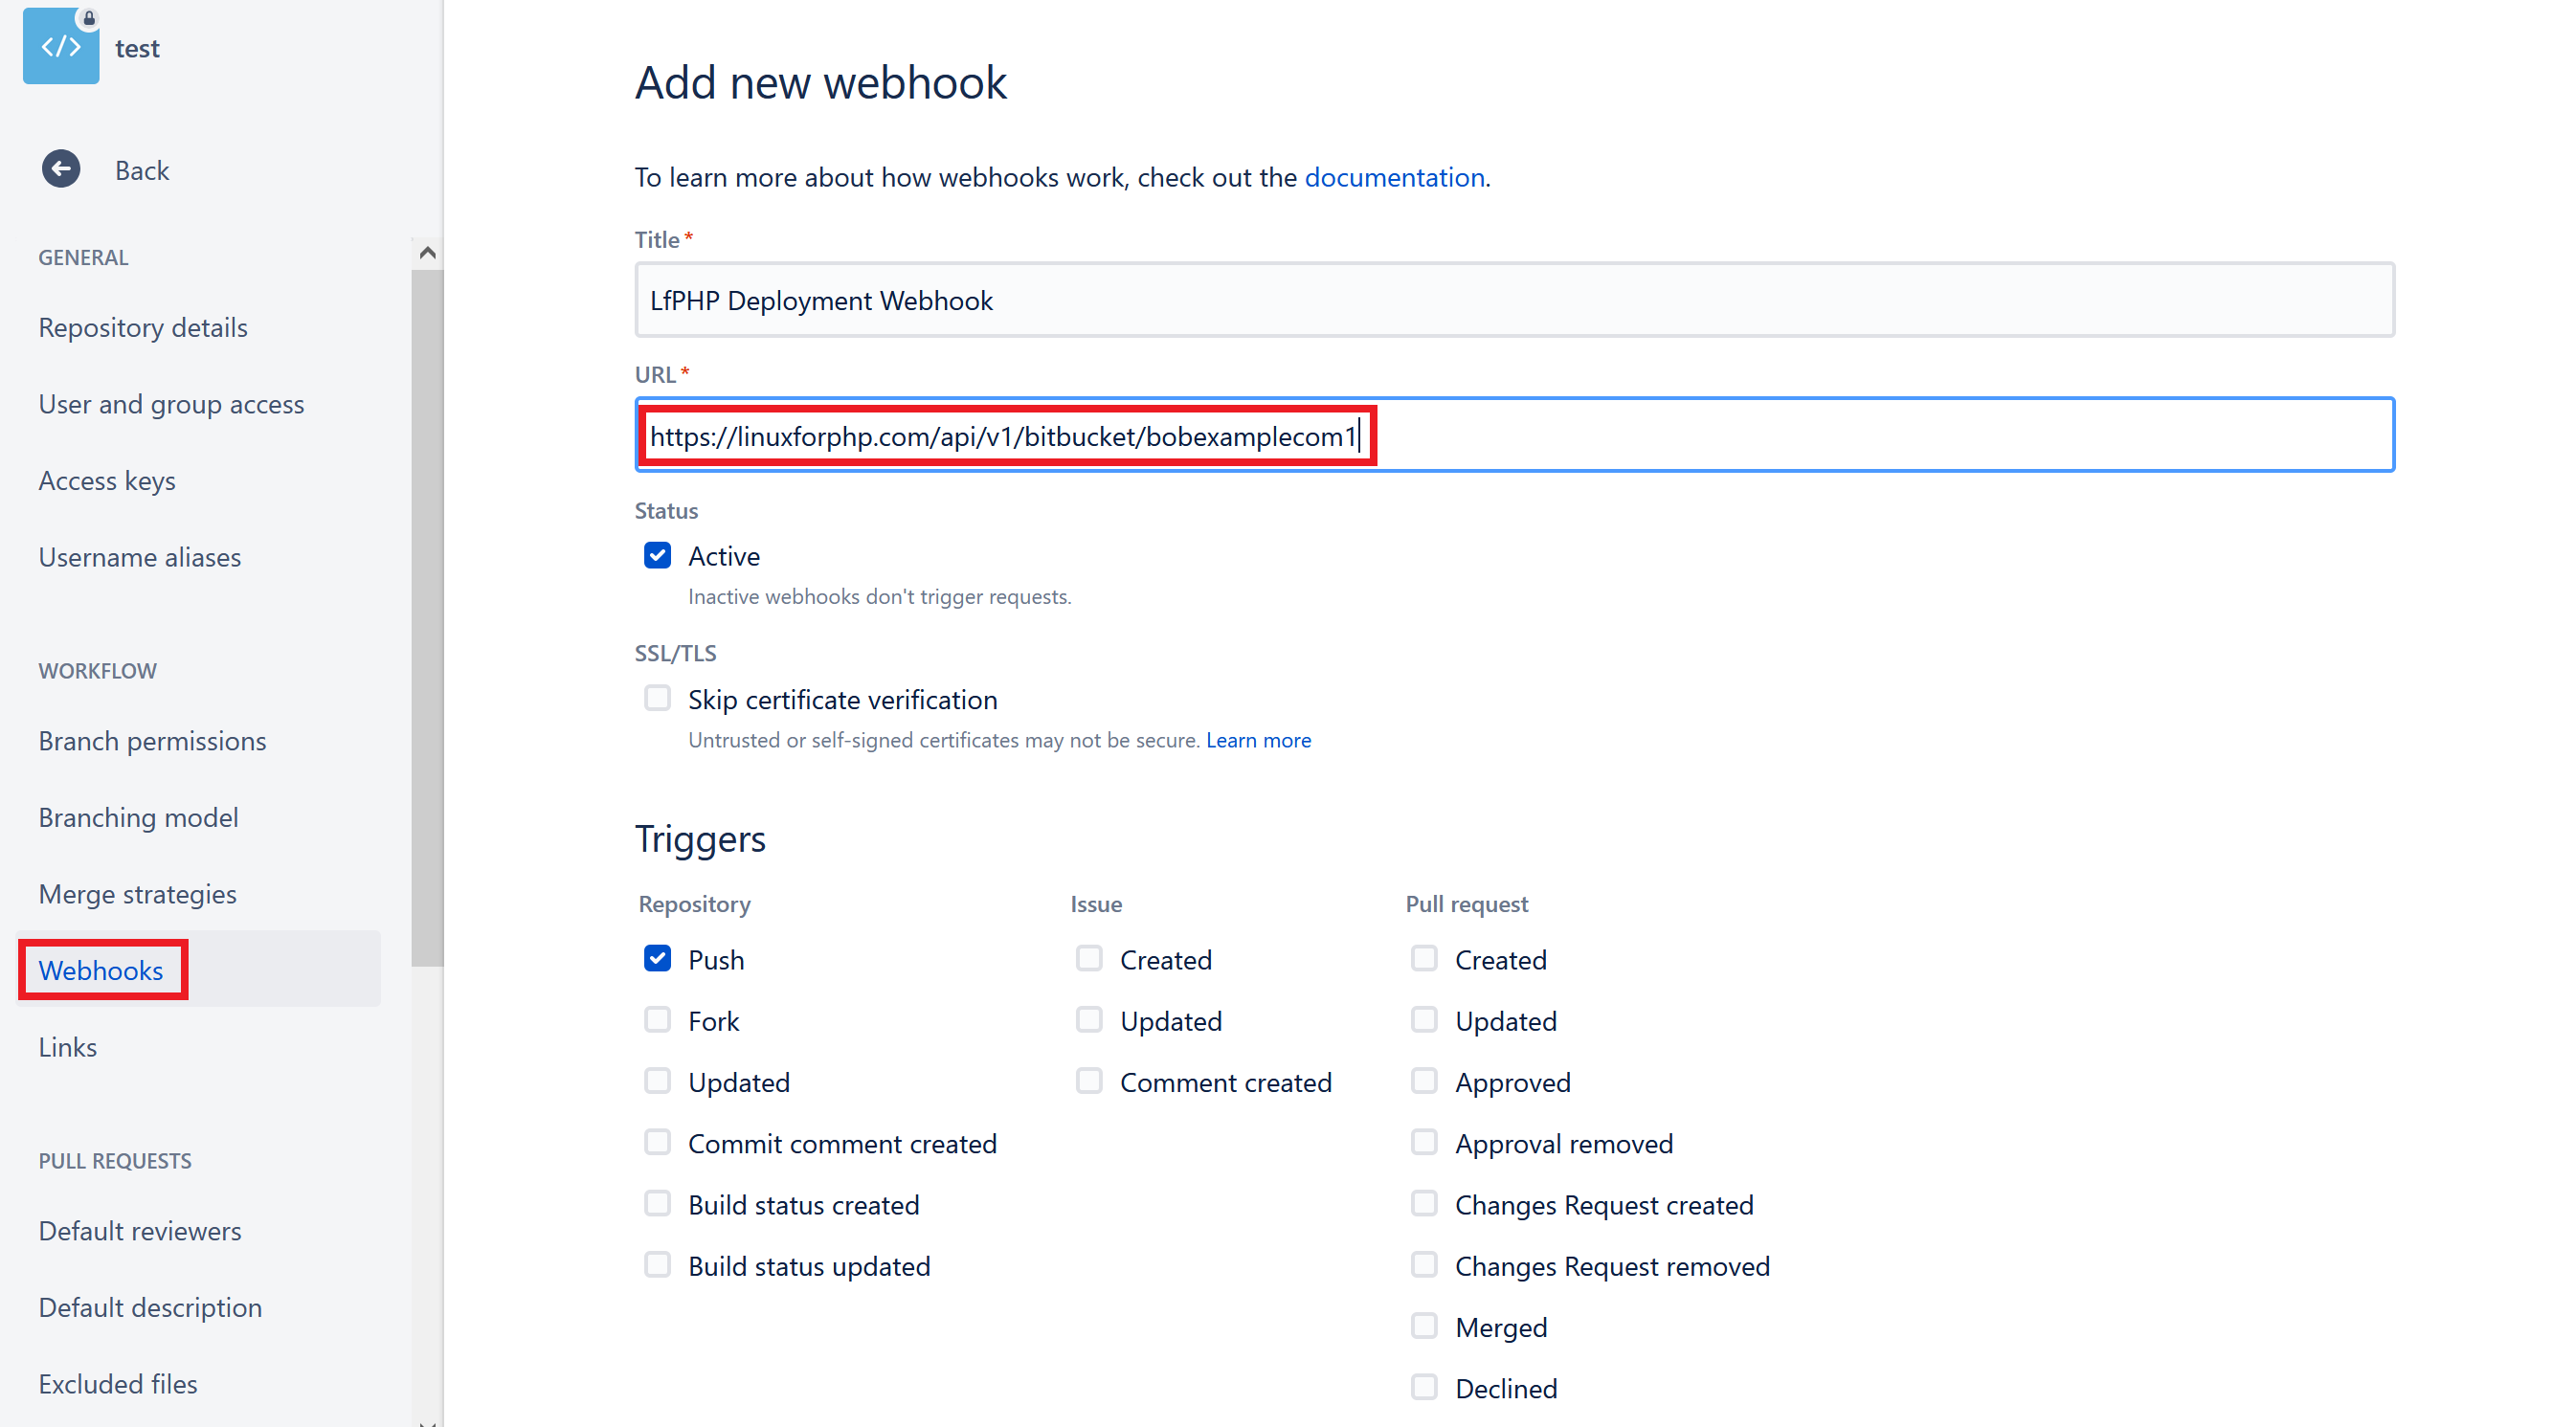
Adding the Bitbucket webhook
Backups
The Backups section makes it possible to generate and download a ZIP file containing all of the files of the One-Click Apps.

A backup was successfully generated
Note
Backups of your databases must be done through the phpMyAdmin interface. The databases are NOT included in these backups!
Logs
The Logs section gives you access to the log files of the One-Click Apps.
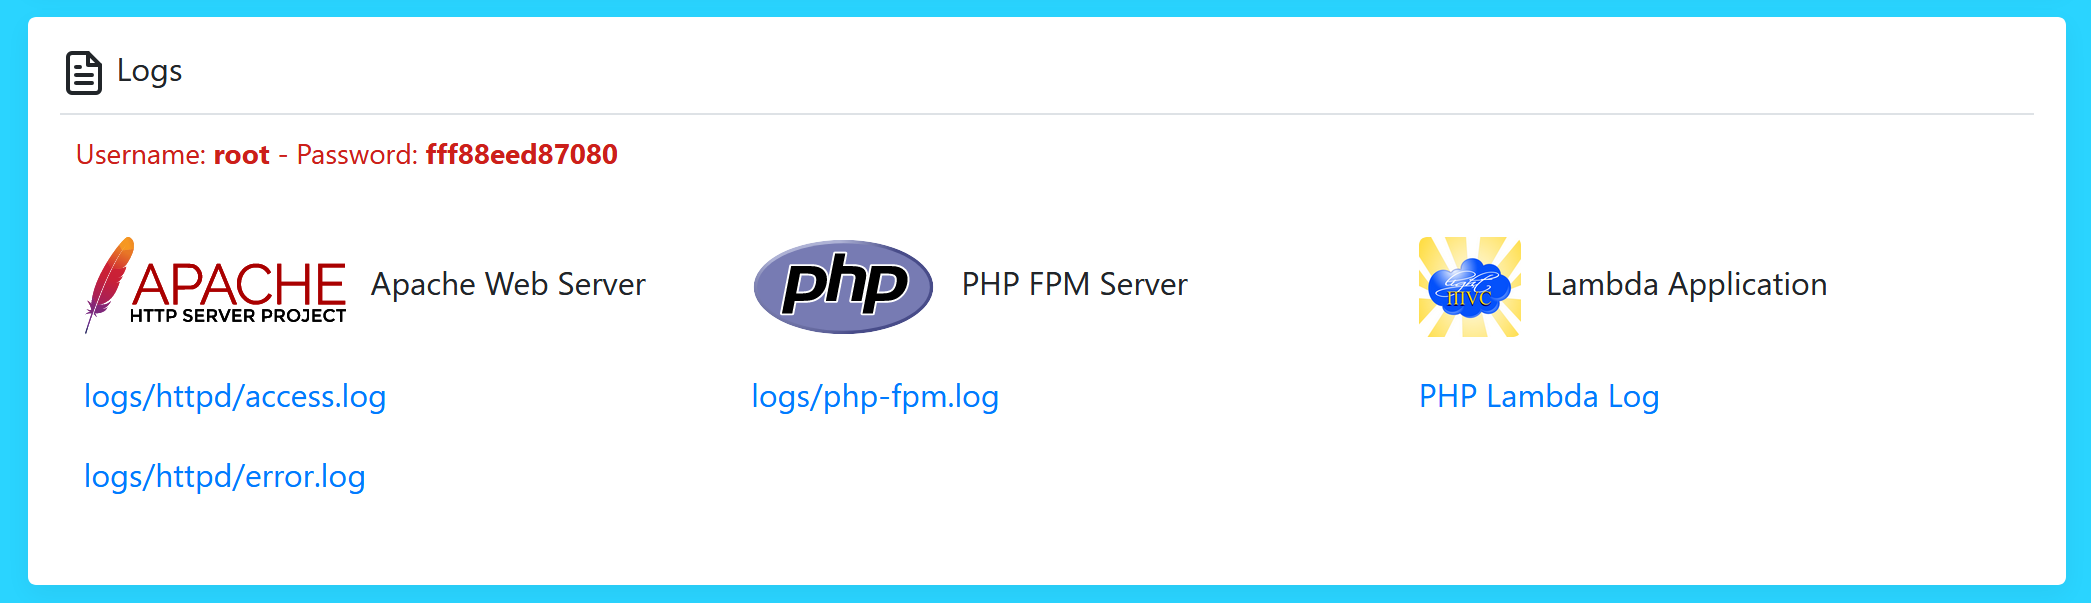
Access the log files
Statistics
The Statistics section will allow you to access the Webalizer records of the One-Click Apps.
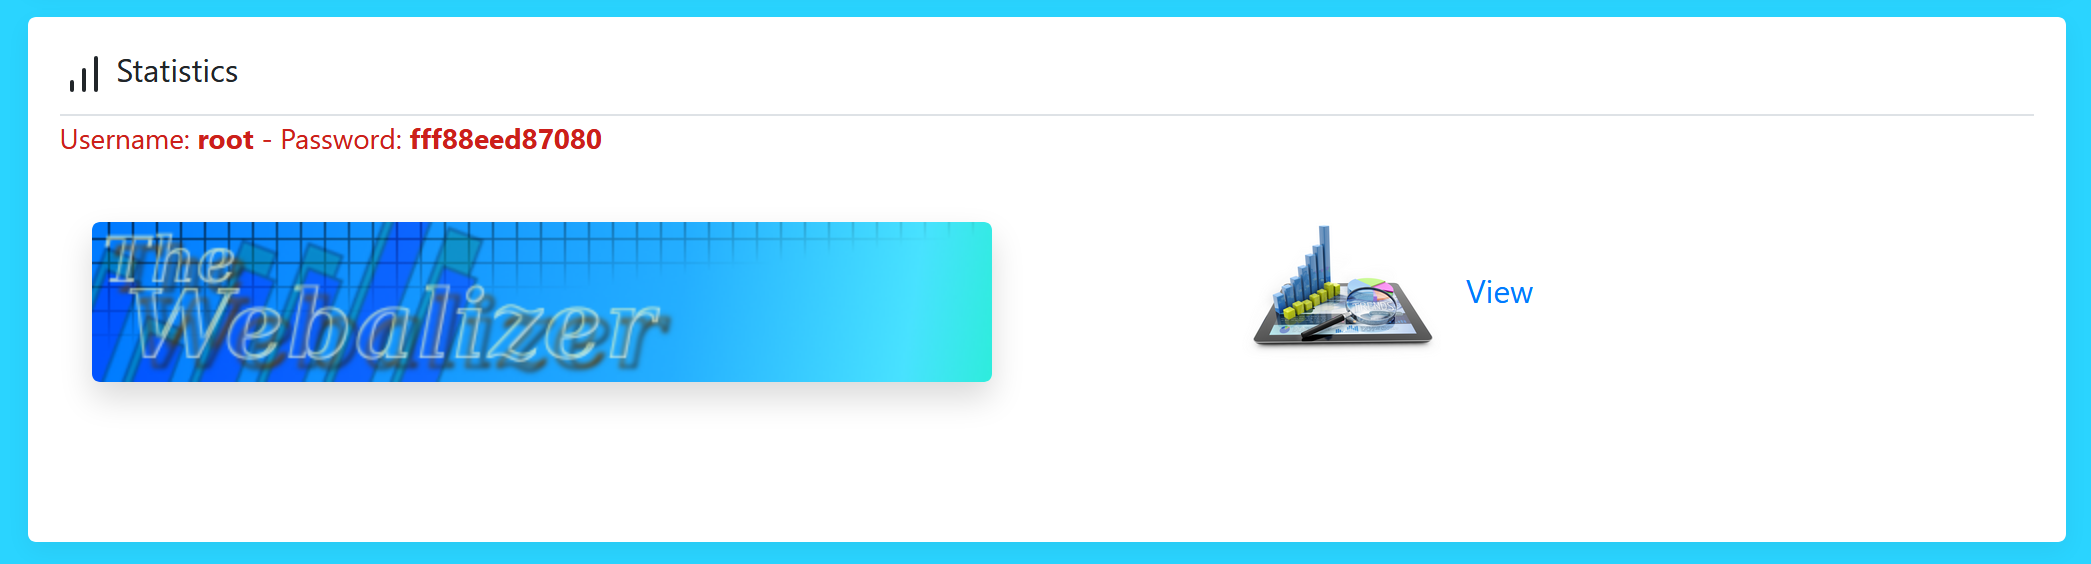
Access Webalizer records
SSH Access
The SSH Access section gives you the information that you need in order to access your hosting plan
from the command line. In order to gain access and obtain an SSH private key, please click on the
Email Us button. Once you receive an email from our customer services, you will have all of the
necessary instructions to access your hosting plan remotely through your computer’s CLI.
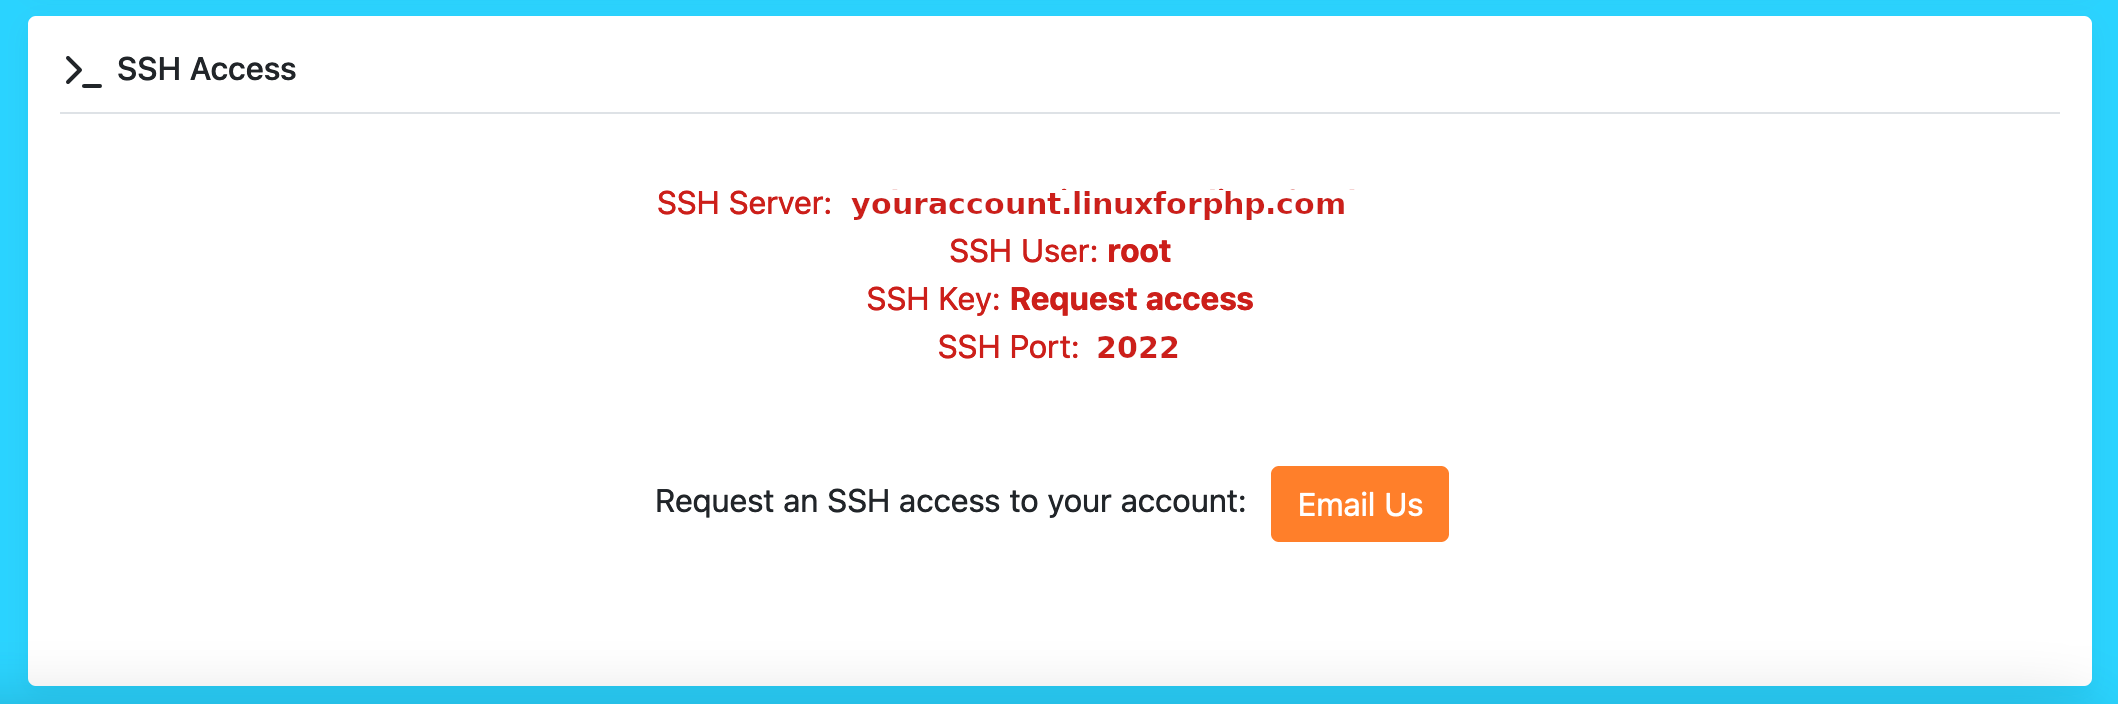
SSH configuration details